
Step into the sweetest handmade moments with this easy and adorable Crochet Baby Shoes Pattern. Perfect for beginners and seasoned crocheters alike, these tiny creations are not only quick to make but also irresistibly cute. Whether you’re crafting a thoughtful baby shower gift, adding charm to a newborn outfit, or simply enjoying the joy of creating with yarn, baby shoes are the ultimate heart-melting project.
Crochet Baby Shoes

With just a bit of yarn, a hook, and a sprinkle of creativity, you can whip up soft, cozy Crochet Baby Shoes that are as special as the little feet they’re made for.
Materials
- Aran weight (4) yarn
Crochet hook:
- 0–3 months: 3 mm (C or 11)
- 3–6 months: 3.5 mm (E or 9)
- 6–12 months: 4 mm (G or 7)
Blunt-ended needle
- Pointy-ended needle
- Scissors
- Buttons
- Needle and thread (for sewing buttons)
- Stuffing (e.g., old cushion stuffing) for blocking
Gauge / Tension
- Measure the sole after finishing it.
- If the size is off due to tension, adjust hook size accordingly (go smaller or larger).
Sole Section
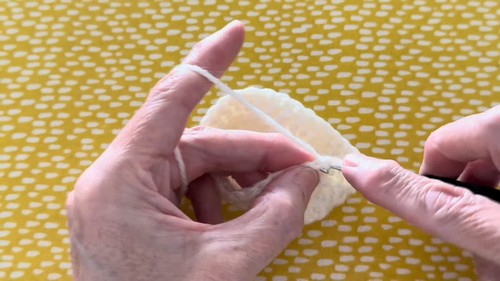
To Begin
- Make a slip knot.
- Chain 10.
Round 1: Forming the Sole
- Into the third chain from the hook, make 2 double crochets (DC).
- Make 1 DC in each of the next 6 chains.
- Into the final chain, make 6 DC.
Work along the other side of the foundation chain:
- Make 1 DC in each of the next 6 chains.
- Into the same stitch where the first 2 DC were made, make 2 DC.
You should now have 22 stitches.
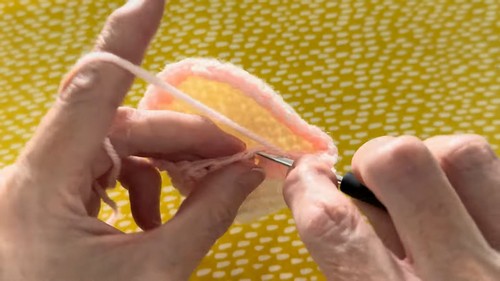
- Slip stitch at the top of the first stitch to join. Do not count the starting chain.
Round 2: Increasing the Sole
- Chain 2.
- Make 2 DC in each of the first 2 stitches.
- Make 1 DC in each of the next 5 stitches.
- Make 2 DC in each of the next 8 stitches.
- Make 1 DC in each of the next 5 stitches.
- Make 2 DC in each of the final 2 stitches.
- You should now have 34 stitches.
- Slip stitch at the top of the first stitch to join.
Body of the Shoe
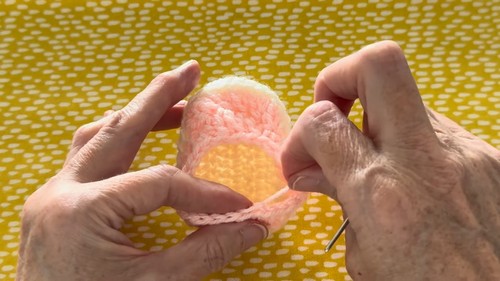
Round 3: Back Loop Only
- Chain 1.
- Make 1 single crochet (SC) in the back loop only of each stitch around.
- Slip stitch to join. Stitch count remains 34.
Round 4: Both Loops
- Chain 1.
- Make 1 SC in each stitch around, working through both loops.
- Slip stitch to join. Stitch count remains 34.
For Round 5: Shaping the Foot (Back Loops Only)
- (Optional) Change color at the start of this round.
- Chain 2.
- Make 1 DC in the back loop only of each of the first 6 stitches.
- Make 1 SC in the back loop only of the next 5 stitches.
- Make 6 double crochet decreases (DC dec) in the back loops only.
- Make 1 SC in the back loop only of the next 5 stitches.
- Make 1 DC in the back loop only of the final 6 stitches.
- You should now have 28 stitches.
- Slip stitch to join.
- Cut off the old color (if changed) and sew in the ends.
Final Round: Adding the Strap
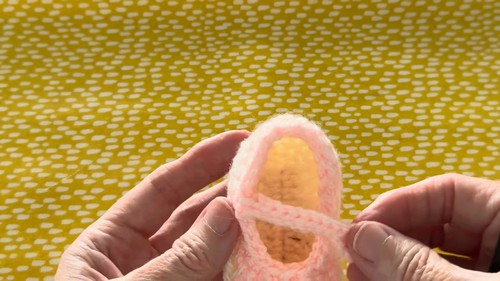
For the Right Shoe
- Chain 1.
- Make 1 half double crochet (HDC) in each of the first 5 stitches.
- Make 1 SC in the next stitch.
- Chain 16.
- Slip stitch into the sixth chain from the hook.
- Slip stitch into each of the next 10 chains back to the body of the shoe.
- Make 1 SC in the next stitch of the shoe.
- Make 4 SC.
- Make 3 double crochet decreases (DC dec).
- Make 6 SC.
- Make 1 HDC in each of the final 5 stitches.
For the Left Shoe
- Chain 1.
- Make 1 HDC in each of the first 5 stitches.
- Make 6 SC.
- Make 3 DC decreases.
- Make 4 SC.
- Make 1 SC in the next stitch.
- Chain 16.
- Slip stitch into the sixth chain from the hook.
- Slip stitch in each of the next 10 chains.
- Make 1 SC in the next stitch on the shoe.
- Make 1 HDC in each of the last 5 stitches.
Finishing

Securing the Yarn
- Cut the yarn, leaving a long tail.
- Pull the tail through the last loop to fasten off.
Using a blunt-ended needle:
- Insert needle under the top loops of the second stitch.
- Pull through, then insert into the back loop of the last stitch.
- Pull through and adjust for a neat finish.
With a pointy-ended needle:
- Sew in all yarn ends, weaving in multiple directions.
- Snip off excess.
Attaching Buttons
- Test the strap to find the best placement for the button.
- Use needle and thread to securely sew the button in place.
Blocking (Optional)
- Lightly mist the shoes with water.
- Stuff firmly with cushion filling or similar.
- Allow to dry completely to help shoes hold their shape.


Leave a Reply