
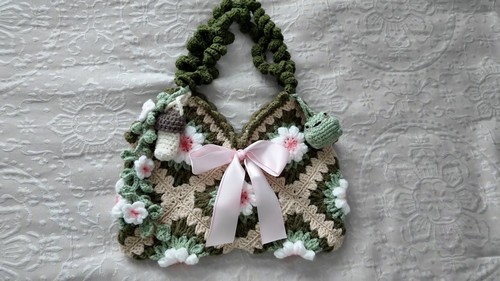
The Crochet Flower Shoulder Bag is a charming project that combines floral granny squares, textured leaves, and a playful ruffled strap into one stylish accessory. Designed with ten flower squares joined together to create a roomy shoulder bag, this pattern offers plenty of opportunities for color customization to match your personal style.
Crochet Flower Shoulder Bag

The dimensional flower centers and leaf details add eye-catching texture, while the scalloped edging and spiral strap give the finished bag a unique handmade touch. Whether you are creating a statement piece for everyday use, a thoughtful gift, or a fashionable addition to your crochet collection, this project provides a satisfying mix of crochet techniques and beautiful results.
Materials
- 4 skeins of yarn (White for flower center, Light Green for leaves, Pink or another color for border/background, Dark Green for strap)
- 3.5 mm crochet hook (or 3.0 mm to 4.0 mm)
- Tapestry needle
- Scissors
Flower Square (Make 10 Squares Total)

Round 1 (Flower Center – White Yarn)
- Make a Magic Ring
- Chain 4 (counts as first double crochet and chain-1 space)
- Work 1 dc, ch 1 into the ring
- Repeat until you have 8 double crochets total, each separated by a chain-1
- Pull the magic ring closed
- Slip stitch directly into the first chain-1 gap
Round 2 (Flower Petals – White Yarn)
- Chain 4
- Work 4 tr into the same gap
- Drop loop from hook
- Insert hook into top of initial chain-4
- Pick up dropped loop and pull through to create bubble stitch
- Chain 2
- In each remaining gap, work 5 tr bubble stitch and chain 2
- Continue until you have 8 petals
- Turn work slightly
- Slip stitch into the small space above the initial chain-4 petal
- Chain 1 and fasten off
For Round 3 (Leaves – Light Green Yarn)
- Attach green yarn to any chain-2 gap
- Chain 4
- Work tr2tog in the same gap
- Chain 2
- Work tr3tog in the same gap
- Chain 2
- In next gap work tr3tog, chain 2, tr3tog, chain 2
- Repeat around all gaps
- Chain 2
- Slip stitch to top of first cluster
- Chain 1 and fasten off

Round 4 (Squaring the Circle – Border Color)
- Attach border yarn to any gap
- Chain 2
- Work 2 hdc in same gap
- In next gap work 3 dc
- In next gap work corner: 3 tr, ch 3, 3 tr
- In next spaces work 3 dc, 3 hdc, 3 dc
- In next space work corner: 3 tr, ch 3, 3 tr
- Repeat around the square
- Finish final section with 3 dc
- Slip stitch to top of starting hdc
- Chain 1 and fasten off
Round 5 (Final Square Expansion – Border Color)
- Attach border yarn to any corner space
- Chain 3
- Work 2 dc in same corner
- Chain 2
- Work 3 dc in same corner
- Work 3 dc in every side gap
- In each corner work 3 dc, ch 2, 3 dc
- Continue around
- Slip stitch to top of beginning chain 3
- Chain 1 and fasten off
Optional Flower Center Shading
Use a cotton swab and pink blush or eyeshadow
Lightly dab color into the flower center
Finishing the Squares
- Weave in all loose ends with a tapestry needle
- Repeat until you have 10 identical flower squares
Sewing the Bag Structure

Layout and Whip Stitching
- Arrange all 10 squares following the diagonal cross layout from the tutorial
- Fold neighboring squares with wrong sides facing out
- Cut a long strand of yarn
- Thread tapestry needle
- Double-knot through starting corner chains
- Whip stitch seams by passing through the back loop of one square and front loop of the opposite square
- Continue along each seam
- Knot securely and trim excess yarn
Forming the Bag Shape
- Turn joined piece over
- Fold outer sides inward
- Create the three-dimensional bag shape
- Whip stitch side edges closed
- Secure all seams
Edging and Ruffles
Single Crochet Border
- Join yarn to the top opening edge
- Chain 1
- Work 1 sc in same space
- Work 1 sc in every stitch around the opening
- If you reach a divider gap, chain 1
- Fasten off and reattach yarn on the opposite side if needed
- Continue until border is complete
Scalloped Ruffle Edge
- Slip stitch into first sc
- Chain 1
- Work 5 dc into same stitch
- Slip stitch into next stitch
- Skip 1 stitch
- Slip stitch into next stitch
- Repeat around the opening
- Fasten off
Ruffled Strap
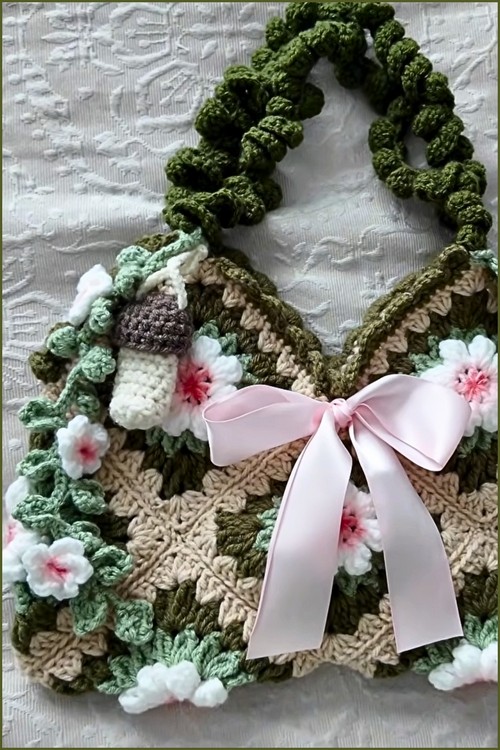
Making the Strap
- Using dark green yarn, make a slip knot
- Chain 94 or desired strap length
- Turn work
- Skip first 2 chains
- Work 3 dc in third chain from hook
- Work 4 dc in next chain
- Alternate 3 dc and 4 dc in each chain across
- Continue to end of chain
- Fasten off
Attaching the Strap
- Position strap ends at the side connection points of the bag
- Pull yarn through both the bag edge and strap loop
- Chain 1
- Work 3 secure slip stitches across the connection point
- Chain 1
- Fasten off
- Weave in all remaining yarn tails



Leave a Reply