
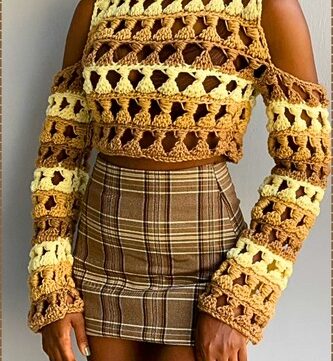
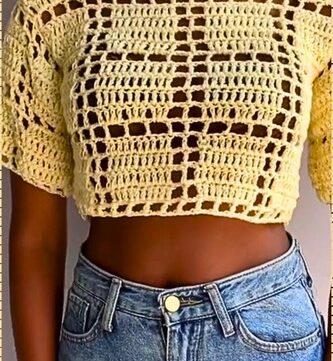
The Crochet Off The Shoulder Top & Sweater Pattern is a chic and versatile design that effortlessly combines style and comfort. Perfect for any season, this pattern allows you to create a trendy off-the-shoulder look that can be dressed up or down.
Crochet Off The Shoulder Top & Sweater

Whether you're lounging at home or heading out for a casual outing, this top and sweater will make you feel effortlessly fashionable. With its delicate crochet detailing and cozy fit, it’s the perfect addition to your wardrobe for those seeking a touch of boho charm with a modern twist!
Materials:
- Size 4 yarn
- 3.5 mm hook
- Yarn needle
- Scissors
- Stitch markers or paper clips
Pattern

Ribbing
For Row 1:
- Start with a slip stitch, then chain 20 (19 chains + 1 for turning).
Row 2:
- Single crochet into the third stitch from the hook, then continue with normal single crochets to the end of the row.
Row 3:

- Chain one, then single crochet into the back loops only to the end of the row.
- Repeat Row 3 for the rest of the ribbing, ensuring each row has single crochets in the back loops only to create a ribbed effect.
- Try the ribbing on your shoulders for fit; it shouldn't be too tight or too loose.
- The example used 158 rows.
Joining Ribbing:
- Slip stitch the two ends of the ribbing together, making sure not to tighten too much but maintaining some tension.
Raglan Sleeve Increases

Preparing Increases:
- Count your total stitches (e.g., 158). For the Raglan increases, you'll be creating increases at four points around the top, proportioned as 1 for the top, 1 for the bottom, and 0.5 for each side, totaling three parts.
- Divide your total stitches by 3, after subtracting 4 stitches for the increases, and round down to get the whole number for each section (e.g., 51 stitches per section).
- Multiply this number by 3, then subtract from your initial total to determine the number of stitches between increases.
Marking Increases:
- Place stitch markers at the points where increases will occur, dividing your rows or stitches accordingly to match the calculations.
- Start the raglan sleeves by chaining four and double crocheting into the same stitch, continuing with double crochets until you reach a stitch marker, where you'll work two double crochets in the indicated stitch to create an increase.

- Repeat this process, always working two double crochets into the stitch before a stitch marker (now moved to the gap between these two double crochets) for every row to create the Raglan shaping.
- Continue until the armholes are at the desired size.
Body:
- Join the panels together between stitch markers (the front and back panels) with double crochets, leaving openings for the arms.
- Work rounds of double crochets around the body portion, connecting the front and back panels until the desired length is reached, ending each row with a slip stitch into the top of the chain.
Sleeves:
- Fasten off the body part of the sweater.
- Attach yarn to the arm opening, chain three (counts as the first double crochet), and work double crochets around each stitch of the arm opening.
- Continue working rounds of double crochets for the sleeve, maintaining the same number of stitches until you reach the desired sleeve length. End with fastening off.

Cuff Ribbing
- Repeat the ribbing process used for the shoulder at the end of each sleeve, and attach it in the same manner with slip stitches.
Bottom Ribbing:
- Work additional ribbing to fit around your lower torso, using the same method as the initial ribbing for the shoulders.
- Attach the ribbing to the bottom of the sweater with slip stitches.

Finishing Touches:
- Turn the sweater inside out to tidy up.
- Weave in all loose ends for a clean finish.

Leave a Reply