
This elastic crochet bikini top is built for a secure fit that keeps its shape in and out of the water. You crochet two structured triangles in the round, using marked corner stitches to create clean, predictable shaping as the cups grow.
Crochet Bikini Top

Because the sizing is row based, you can easily adjust coverage by stopping earlier for a smaller cup or adding rounds for more depth. A simple eyelet band along the bottom lets you weave in a long back strap for adjustability, and the top point of each triangle creates a strong anchor for neck ties. Once the crochet is complete, you sew each triangle onto bikini cups or a lining, giving the top more support and a smooth finish against the skin.
Materials
- Elastic bikini yarn suitable for swimwear
- 2 mm crochet hook
- Stitch markers
- Bikini cups or lining fabric
- Pointed tapestry needle
- Measuring tape
- Scissors
Abbreviations and Notes
- ch = chain
- sl st = slip stitch
- sc = single crochet
- dc = double crochet
- st = stitch
- sk = skip
- Corner marker rule means the marked stitch is always the middle dc of the five dc corner group
- Work tightly and evenly because elastic yarn can stretch and relax during wear
- Make two identical triangles before adding straps and assembly
Fit and Sizing Overview
- This pattern sizes by rounds rather than fixed stitch counts after the first round
- Stop when the triangle is about one finger width larger than your bikini cup for full coverage
- If using only lining fabric instead of cups, stop when the triangle matches your preferred coverage on the body
- For more coverage add rounds before the eyelet band and edging
- For less coverage stop earlier and proceed to the finishing rounds
Gauge Guidance
- Gauge is not critical, but consistency is
- If the fabric feels too stiff move up one hook size
- If the fabric feels too loose or gappy move down one hook size
- Elastic yarn usually looks best with firm stitches and minimal holes in the cup area
Triangle Cups Make 2
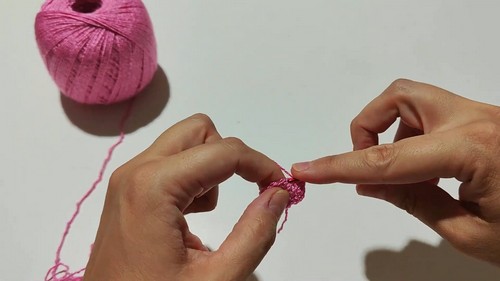
Cup Foundation Round 1 Magic Ring Circle
- Make a magic ring
- Ch 3 to count as the first dc
- Work 11 dc into the ring for a total of 12 dc including the starting ch 3
- Pull the ring closed firmly
- Join with a sl st into the top of the starting ch 3
For Cup Shaping Round 2 Turn the Circle Into a Triangle
- Begin with a fake dc by working sc then ch 2
- Dc in the next 2 sts
- In the next st work 5 dc to form Corner 1
- Place a marker in the 3rd dc of this 5 dc group
- Dc in the next 3 sts
- In the next st work 5 dc to form Corner 2
- Place a marker in the 3rd dc of this 5 dc group
- Dc in the next 3 sts
- In the next st work 5 dc to form Corner 3
- Place a marker in the 3rd dc of this 5 dc group
- Join with a sl st to the top of the fake dc
Cup Growth Rounds 3 and Up Create Depth
- Begin the round with ch 3 or a fake dc to match your tension
- Dc in each st around
- In each marked corner st work 5 dc
- Move the marker to the 3rd dc of the new 5 dc group each time you make a corner
- Join with a sl st at the end of the round
- Repeat these growth rounds until your cup reaches your desired size
How to Know When the Cup Is the Right Size
- Place the triangle over your bikini cup or over the bust area
- The triangle should be about one finger width larger than the cup edge to allow for sewing and stretching during wear
- If the top point feels too sharp add one more growth round
- If the sides feel too wide stop and continue to finishing
Cup Count Reference Example
- A common size in the tutorial reached the target size after about 10 growth rounds
- Your number may be different based on yarn stretch and personal coverage preference
Part 2 Bottom Eyelet Band
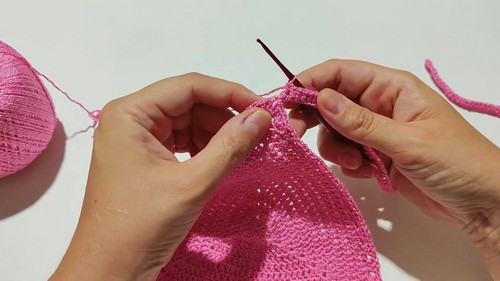
Eyelet Round Create Holes for the Back Strap
- Start at the bottom edge section of the triangle and work evenly along the lower side
- Work dc in the first st
- Ch 1
- Sk 1 st
- Dc in the next st
- Repeat dc ch 1 sk 1 across the bottom edge section
- Keep the eyelets even so the strap weaves smoothly
- When you reach the corner area continue following the edge shape without tightening
Adjusting the Eyelet Spacing
- If your stitches are very tight use dc ch 1 sk 0 in some sections to avoid pulling
- If your stitches are looser keep dc ch 1 sk 1 consistently
Side Edge Decorative Finish
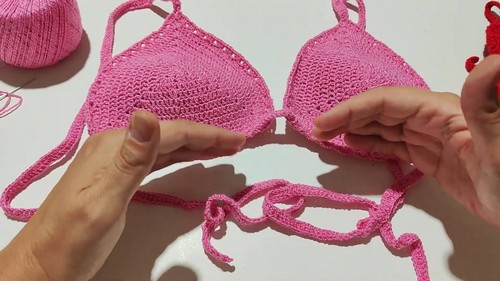
Side Edging Round Create a Clean Decorative Border
- Attach yarn at one bottom side corner
- Sk 2 sts
- In the next st work 3 dc in the same st
- Sk 2 sts
- Repeat 3 dc in next st sk 2 along the side edge toward the top
- Keep the 3 dc groups aligned and avoid adding extra stitches
Top Point Space for Neck Strap
- When you reach the very top corner st work 2 dc ch 1 2 dc into the same st
- This ch 1 space will be the anchor for the neck strap
- Continue down the other side with the same edging pattern
Part 4 Straps
Neck Straps Make 2
- Join yarn into the top point ch 1 space
- Ch until the strap measures about 50 cm or your preferred length
- Dc in the 3rd ch from the hook
- Dc in each ch across back to the cup
- Sl st into the same top point space to secure
- Fasten off neatly
- Repeat for the second cup
Neck Strap Fit Notes
- For a halter that ties high on the neck make longer straps
- For a lower tie behind the neck make slightly shorter straps
- Elastic yarn can feel snug so do not undersize the strap length
Back Strap Make 1 Long Strap
- Measure around the body under the bust where the band will sit
- Multiply that number by 1.5 to add about 50 percent extra length for tying
- Example if underbust is 94 cm then strap length target is about 140 cm
- Ch until the strap matches your target length
- Dc in the 3rd ch from the hook
- Dc in each ch across
- Fasten off leaving a tail for weaving
Back Strap Options
- If you prefer a thinner tie strap do not work back in dc and leave it as chains
- If you want a sturdier tie work one row of dc as written
- If you want extra firmness work a second row of dc
Assembly and Finishing
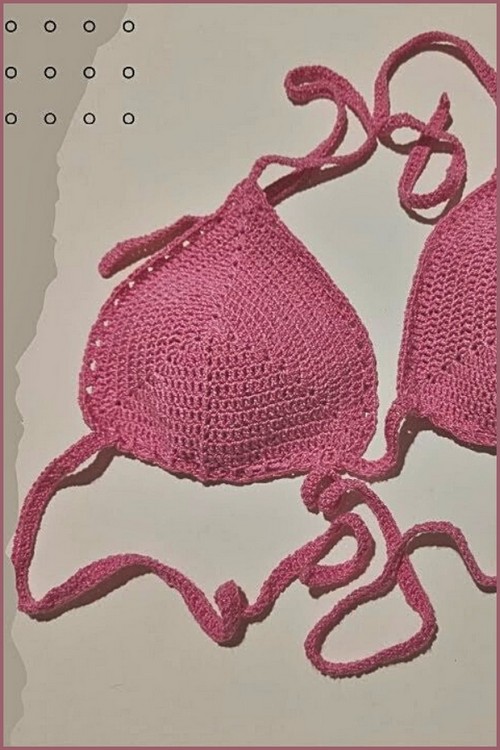
Prepare the Cups
- Make sure both crochet triangles are the same size
- Weave in all ends except those you want to use for sewing
- Lightly stretch the triangles and let them relax so you sew them in their natural resting size
Sewing the Crochet to Bikini Cups or Lining
- Place one crochet triangle on top of a bikini cup
- Align the top point with the cup apex
- Thread the pointed tapestry needle with the same elastic yarn
- Sew around the outer edge of the cup using small whip stitches
- Keep the stitches close together so the edge sits smooth
- Do not pull too tightly or the cup edge will pucker
- Repeat for the second cup
If You Are Using Lining Fabric Instead of Cups
- Cut lining fabric to match the triangle shape with a small seam allowance
- Hand stitch the lining to the back of the crochet triangle
- Then sew the lined triangle to the strap system as written
Join the Two Cups on the Body With the Strap Weave
- Lay both triangles flat with the bottom edges facing inward toward each other
- Identify the eyelet band along the bottom of each triangle
- Starting at the center area weave the back strap through the eyelets
- Weave from center outward so both sides stay even
- Continue weaving until the strap exits at the outer bottom edges
- Tie the back strap behind the body
Final Fit Check
- Put the top on and tie the neck straps first
- Adjust the cups so they sit evenly
- Tie the back strap securely
- If the cups feel too far apart re weave the strap starting closer to the center
- If the cups feel too close re weave leaving a slightly wider center gap
- If you need more support shorten the back strap slightly or add a second row of dc to thicken it
Finishing
- Weave in all remaining ends securely
- For swimwear durability weave ends through several stitches and back again
- Trim close and avoid bulky knots
- If your yarn allows you may carefully melt tips only if the yarn is synthetic and you know it is safe to do so
- Rinse and dry flat before first wear to let the elastic settle
Customization Ideas
- Add a second edging round in sc for a smoother outline
- Add small beads only if they are rustproof and swim safe
- Add a center connector such as a small ring and stitch the triangles to it before weaving the back strap
- Add removable padding by sewing a small opening in the lining if you use fabric lining


Leave a Reply