
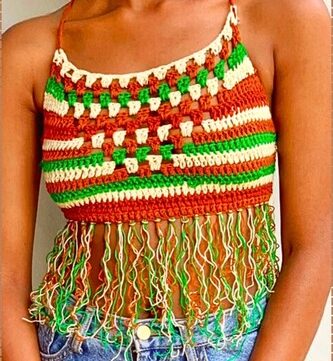
The Wavy Button-Up Top is the perfect crochet project for adding a stylish and unique piece to your wardrobe. This top features a textured wavy stitch pattern and is customizable in terms of color and size, making it a versatile addition to any outfit.
Crochet Button Up Top

Whether you’re crocheting it for yourself or as a gift, this pattern is designed to help you create a comfortable and fashionable top. The button-up design adds a touch of practicality, allowing for easy wear and removal. With its simple construction and customizable options, this crochet top is a fun and rewarding project for crocheters of all levels.
Materials Needed
- 8 ply cotton yarn in three different colors
- 3 mm hook
- Scissors
- Measuring tape
- Stitch markers
- Darning needle
- Buttons
Foundation Chain
- Create a slip knot and insert your hook.
- Chain the required number of chains based on your size. The video creator chained 147 for a size small.
- If using cm/inch measurements, keep chains in groups of three.

Body of the Top
- Row 1: Chain two extra, then double crochet into the third chain from the hook. Alternate between three double crochets and three single crochets down the row.
- Row 2: Chain up based on the last stitch (two for double crochet, one for single crochet). Repeat the pattern from Row 1, placing the same stitch into the stitch of the previous row.
- Color Change: Change colors halfway through the last stitch of a row.
Continue the established pattern, alternating stitches in each row (e.g., double crochets in the previous row, single crochets in the current row).
- Repeat this pattern until you reach the desired length for the bottom section. The video creator worked until row 22.
Decreasing the Back
- Stitch into the first section to shape the front panel. For a size small, stitch into the first 36 stitches.
- Turn around and continue building up this section for 8 rows (for size small).
- Join the same color used at the beginning of this section and crochet along the row. Fold and stitch into the corresponding stitches of the previous row.
- Repeat the process on the other side, mirroring the stitch count and row count from the first side.
- Continue the established stitch pattern until the top reaches the desired length.

Trim
- Attach yarn to the edge of the front panel and create a trim using white yarn.
- Work two double crochets into each double crochet row end and one double crochet into each single crochet row end.
- Repeat the trim on the other side, starting from the bottom to maintain stitch direction.

Buttonholes (Optional)
- If using larger buttons, create buttonholes by chaining one and skipping a stitch at desired intervals.

Straps
- Chain 69 for a size small (adjust based on your size).
- Work the same stitch pattern as the body of the top for four rows, changing colors as desired.
- Attach the straps to the top, ensuring they are evenly spaced and properly aligned.

Finishing
- Stitch down any folded sections for a neater finish.
- Weave in all loose ends to secure the yarn.
- Sew on buttons opposite the buttonholes, if applicable.

Leave a Reply