
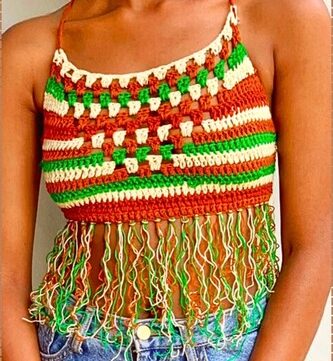
This crochet pattern guides you through creating a chic, comfortable plus-size halter top, perfect for adding a personalized touch to your wardrobe. Whether you're a beginner or an experienced crocheter, this pattern provides clear instructions for making a versatile piece that can be adjusted to fit your unique style.
Crochet Halter Top

The design features a flattering silhouette with customizable width and strap length, ensuring that you can create a halter top that fits you just right. With its simple stitches and easy-to-follow steps, you'll have a stunning handmade halter top in no time, ready for the warm weather or layering with your favorite outfits.
Materials Needed
- Two bundles of Red Heart Yarn in Grenadine/Baby Pink
- 4.0 mm crochet hook
- Tape measure
- Scissors
Creating the Base
- Make a slip knot.
- Chain 15.
- Single crochet 14 stitches down, skipping the first chain.
- Chain one and turn your work.
- Single crochet in the back loops only.
- Repeat until the piece measures about 19.5 inches, halfway to the desired 39-inch circumference.
- Continue until you reach a total circumference of 39 inches.

Closing the Base
- Line up the edges of the crocheted piece.
- Push the hook through both sides and yarn over.
- Single crochet through both layers to join, creating a foundation.

Creating the Body of the Shirt
- Single crochet all the way around the top edge of the foundation.
- Join the last stitch with a slip stitch.
- Chain two and turn your work.
- Half double crochet in each stitch around.
- Repeat the half double crochet rows for a total of 11 rows.

Shaping the Halter Top
- Skip the first stitch and single crochet down one side.
- Turn your work without chaining and single crochet back.
- Repeat this decrease on both sides until you reach the desired width for the top.

Finishing and Adding Straps
- Turn the shirt inside out.
- Attach yarn at the bottom corner and slip stitch up the side for a clean edge.
- At the top corner, half double crochet three stitches to start the strap.
- Chain one, turn, and half double crochet across the three stitches.
- Repeat until the strap reaches the desired length.
- Repeat the process on the other side to create a second strap.
- Weave in all loose ends to secure and finish the halter top.

Additional Notes
- Adjust the width and length of the halter top and straps to your preference.
- Alternatively, create a one-strap halter top by connecting one strap to the other side.
- Use stitch markers to mark the beginning and end of decrease rows.
- Weave in ends with a needle for a cleaner finish.

Leave a Reply