
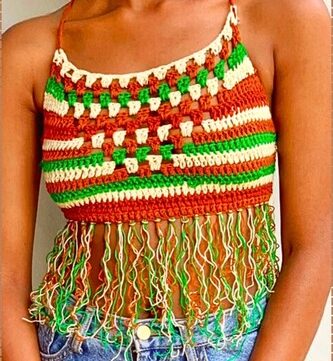
Get ready to elevate your handmade wardrobe with this trendy Drop Loop Bralette crochet pattern. Perfect for summer festivals, lounging at home, or layering over your favorite outfits, this pattern blends simplicity with an eye-catching textured design. The drop loops create a stunning visual effect while adding breathability and softness to the fit.
Crochet Drop Loop Bralette

It’s fully customizable—whether you’re adjusting the size to match your bust or adding buttonholes to suit your style. Ideal for confident beginners to intermediate crocheters, this bralette is not just fun to make but also ultra-stylish to wear.
Materials Needed
- Yarn of your choice (lightweight cotton recommended)
- Crochet hook suitable for your yarn
- Ruler or similar tool for drop loops (approx. 4cm wide)
- Scissors
- Tapestry needle
- Stitch markers
- Buttons (at least 4)
Step-by-Step Instructions

Base Chain and Foundation
- Start with a slip knot.
- Chain until the length matches your bra size.
- If unsure, measure around the fullest part of your bust.
Foundation Row
- Flip the chain and work a single crochet into each back bump.
- Chain one, turn, and single crochet across to anchor the row.
Body Section
- Continue with single crochet rows until you have 11 rows in total.
- Optional: Add a buttonhole at the end of row 6 by chaining and skipping stitches.

First Drop Loop Row
- Chain one.
- Pull up a loop and place it onto your drop loop tool (ruler, incense holder, etc.).
- Pull back a loop from the last stitch, chain one, and place that on the tool.
- Repeat across the entire row.
- Carefully slide off all loops, keeping the last stitch on your hook.
- Chain one to secure, then single crochet into each loop.
Post-Loop Rows
- Work 6 rows of single crochet.
- Add three more buttonholes evenly spaced.

Second Drop Loop and Follow-Up Rows
- Work another drop loop row as before.
- Follow with one single crochet row.
- Work at least 6 more single crochet rows.
Shaping the Tube
- Fold the sides in to form a tube shape, ensuring it matches your bra strap width.
- Crochet 6 single crochet rows, stopping halfway through the width.

Center Marking and Decrease Section
- Mark the center of the new section and the front of the bralette.
Begin invisible decreases:
- Work through the front loop of each stitch on one side.
- Crochet the center stitch alone and mark it.
- Mirror the decreases on the other side.
- Continue until only three stitches remain.

Straps and Finishing
- Chain over the shoulder and attach to the back side.
- Slip stitch across the back twice, chain up again, and slip stitch across.
- Attach the opposite strap, working toward the center.
- Repeat the strap creation process for the second side.
- Add an extra button at the top if desired.
- Weave in all loose ends with a tapestry needle.

Leave a Reply