
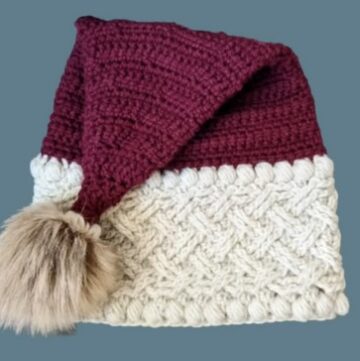
Get set to make your very own crochet beanie hat, a cozy and stylish addition to any wardrobe. With some yarn and a hook, you can whip up this comfy head-warming treasure. Crocheting a beanie is a fun project whether you're new to the hobby or looking to add a simple design to your collection.
Crochet Simple Beanie Hat

Materials Needed
- Yarn in two colors (for the beanie body and the pom-pom)
- Scissors
- Needle
- Stitch marker
- Crochet hook (3.5 mm)
- The yarns mentioned are acrylic 4 ply.
Making the Beanie

Start with a Slip Knot:
- Begin your project by creating a slip knot on your crochet hook.
Chain 56:
- Make 56 chains. This forms the base of your beanie.
Add a Turning Chain:
- After your 56 chains, add one more chain. This serves as the turning chain.

First Row of Single Crochet:
- Start single crochet into each stitch along the chain.
- Leave 10 chains unworked at the end.
- Continue single crocheting into the remaining chains until you've completed the row.
Slip Stitches Over 10 Chains:
- Place a stitch marker, then perform slip stitches over the next 10 chains that were left unworked.

- This creates a gap or space in the beanie.
Work in Back Loops Only:
- Chain one, then flip your work.
- From now on, work into the back loops only of each stitch.
- For the next row, start with slip stitches over the 10 stitches where the stitch marker is placed, ensuring you keep these stitches somewhat loose for ease of working.
Complete the Row with Single Crochets:
- After the 10 slip stitches, continue the row by doing single crochet into the back loop only of the remaining 46 stitches.
- Finish the row, chain one, and flip your work.

Alternate Between Slip Stitch and Single Crochet Sections:
- For the start of each new row, ensure to take both loops of the first stitch if beginning with single crochet, followed by back loop only single crochets for the rest of the row.
- Repeat the pattern of slip stitches and single crochets as established, marking the start of the slip stitch sections with the stitch marker.
Measure and Repeat:
- Continue the pattern until the beanie reaches your desired length and width—approximately 13.5 inches in width if following the video's dimensions.
Finishing the Beanie

Sew the Sides Together:
- Once the crocheting part is done, fold the beanie to align both ends. Sew the sides together using a needle and yarn.
Close the Top:
- Sew in and out around the top of the beanie to close it. Secure and tie off the yarn once complete.
Adding the Pom-Pom

Create the Pom-Pom:
- Using the second color of yarn, wrap the yarn around three fingers to the thickness desired.
Secure the Pom-Pom:
- Cut the yarn from the skein, then tie a piece of yarn around the middle of the loops tightly to secure it. Cut the loops at both ends to form the pom-pom.
Attach the Pom-Pom:
- Sew the pom-pom onto the top of the beanie.
Final Touches:
- The video suggests the beanie has a good stretch and fits children as well as adults.
- For a feminine touch, consider adding a decorative element like a butterfly or flower on the top.

Leave a Reply