
Crocheting an Evil Eye keychain is not only a fun project but also a meaningful one. This design features the iconic symbol of protection, making it both trendy and symbolic. Whether you’re a beginner or a seasoned crocheter, this step-by-step guide will walk you through creating a charming Evil Eye keychain using simple techniques.
Crochet Evil Eye Keychain

Customize it with different yarn colors to match your style, and use it as a keychain, bag charm, or car accessory. The process is straightforward, and the results are stunning, making it the perfect project for personal use or as a thoughtful gift.
Materials
- Yarn in four colors: black, royal blue, white, and sky blue (4-ply acrylic yarn recommended)
- 2.5 mm crochet hook (or larger for a bigger project)
- Scissors
- Fiber filling for stuffing
- Yarn needle
- Bead or tassel for the end of the chain
The Black Circle
- Using black yarn, make a magic ring.
- Chain three stitches (counts as the first double crochet).
- Work 14 more double crochets into the magic ring for a total of 15 stitches.

- Pull the thread tight to close the ring.
- Slip stitch into the third chain of the initial chain.
- Chain one and cut the thread.
The Sky Blue Ring
- Attach the sky blue yarn to any stitch on the black circle.
- Chain three.
- Work one double crochet into the same stitch where you chained three.
- Work two double crochets into every subsequent stitch around the circle.
- Slip stitch and chain one before cutting the thread.
The White Ring
- Attach white yarn to any stitch.
- Chain three.
- Work one double crochet in the next stitch, followed by two double crochets in the next.
- Continue alternating between one and two double crochets around the ring.
- Slip stitch into the third chain of the initial chain and cut the thread.
The Royal Blue Ring
- Attach royal blue yarn to any stitch.
- Chain three.
- Continue with the pattern of one double crochet, one double crochet, and then two double crochets (1, 1, 2) around the entire ring.
- Slip stitch into the third chain and cut the thread.
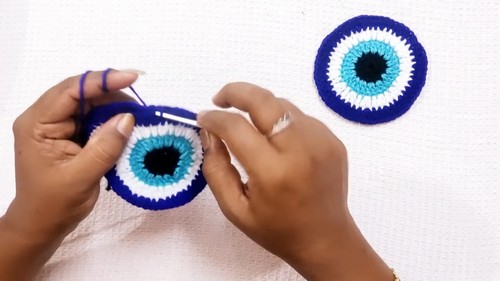
Assembly & Finishing
- Create a second, identical piece, but do not cut the thread after the final slip stitch.
- Place the two pieces with wrong sides facing each other.
- Join the pieces by single crocheting through both layers.
- Leave a small gap open for stuffing and fill with fiber filling.
- Single crochet the remaining gap to close the piece.

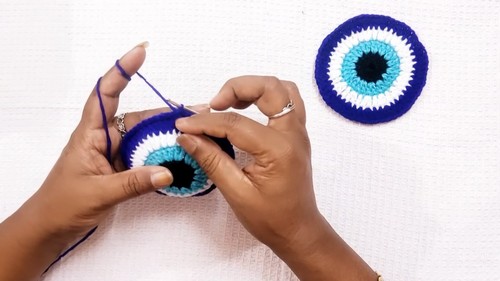
Adding the Chain
- From where you finished the single crochet seam, make a chain.
- The recommended number of chains is 20 for a keychain, 40 for a bag charm, and 80 for a car hanging.
- Slip stitch back into the same space where the chain started, then chain one and cut the thread.
- Using a yarn needle, weave in the excess thread.
- Attach a bead, tassel, or pom-pom to the end of the chain.


Leave a Reply