
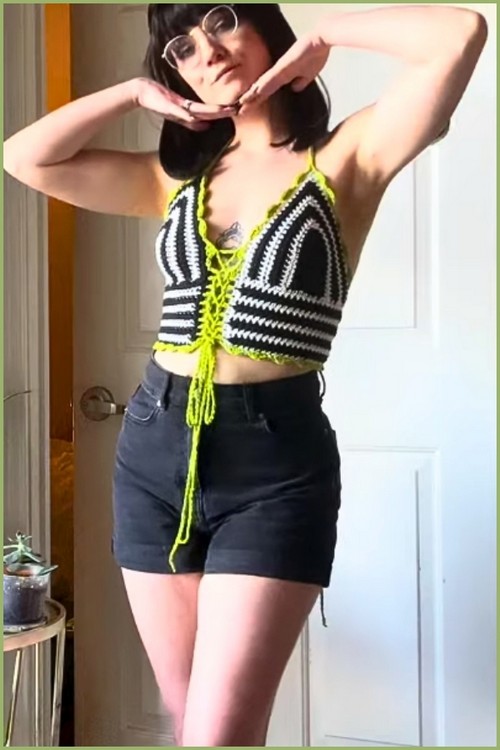
This Beetlejuice inspired crochet corset pattern is built for a dramatic striped look with a customizable, body hugging fit. The design starts with shaped bra cups, then extends into torso panels that create the corset structure, finished with borders, green mesh detailing, and scalloped edging for a signature pop.
Crochet Corset Top
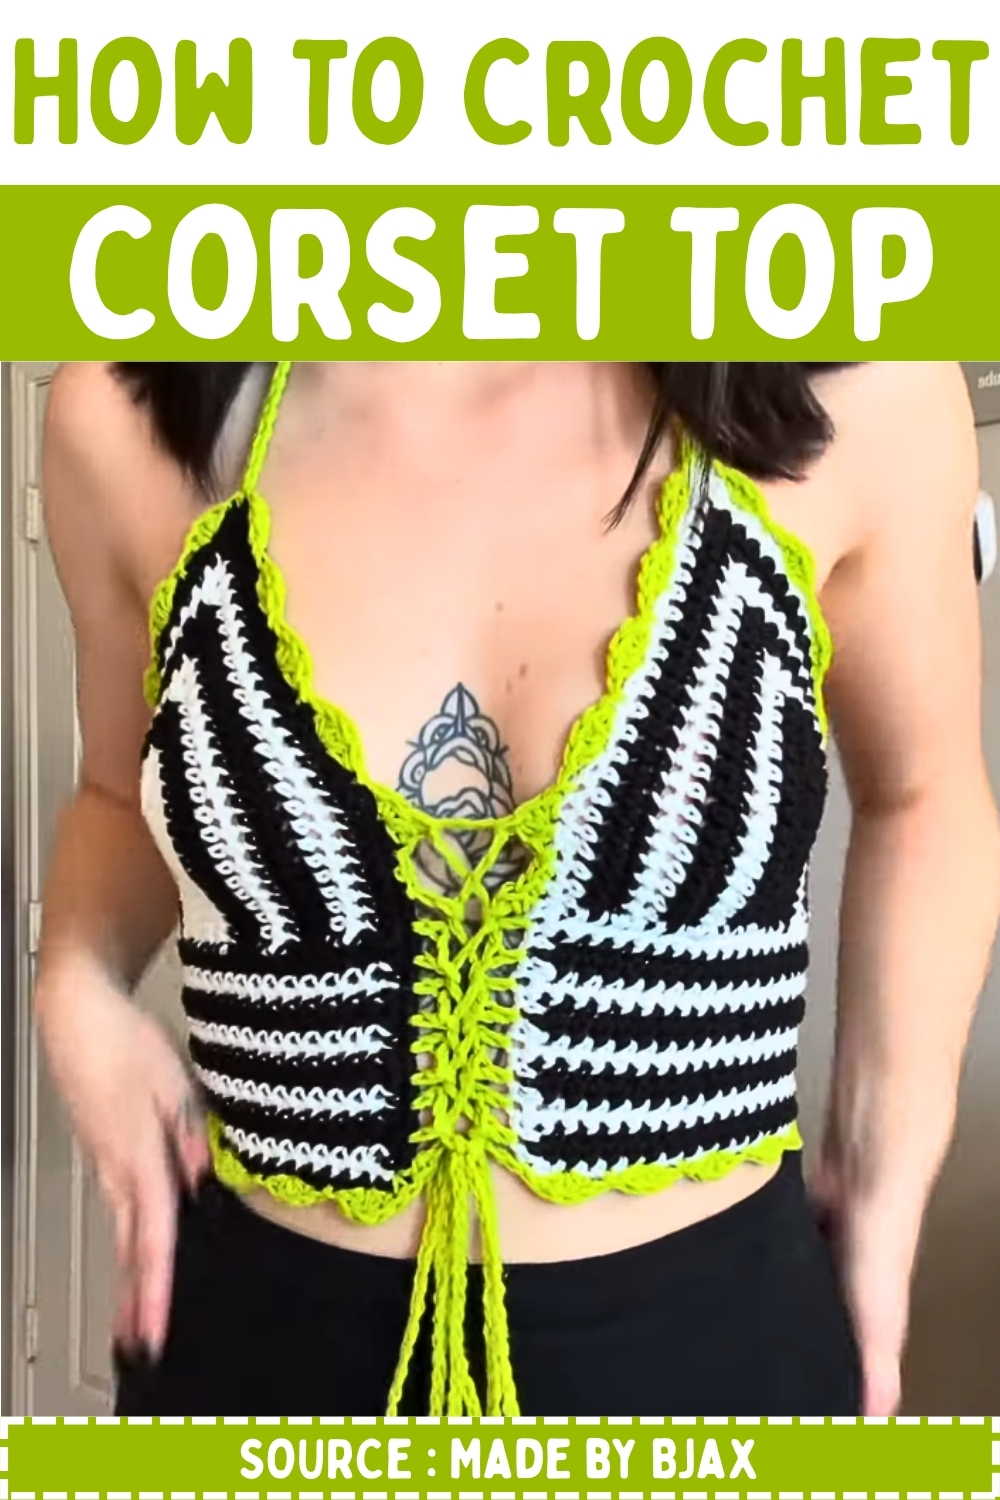
Because the corset closes with lace up eyelets on the front and back, you can fine tune the fit for comfort and support, making it a great choice for cosplay, Halloween outfits, festival styling, or anyone who wants a bold handmade statement top. You can also adjust the length, stripe order, strap length, and lacing style to suit your body and styling needs.
Materials
- Yarn in Black, White (optional glow in the dark), and Green
- Crochet hook size to match your yarn (commonly 4.0mm to 5.0mm)
- Stitch markers
- Scissors
- Yarn needle
Abbreviations
- ch = chain
- sc = single crochet
- hdc = half double crochet
- dc = double crochet
- sl st = slip stitch
- sc2tog = single crochet two together (decrease)
Notes Before You Start
- This corset is constructed from bra cups plus torso extensions, then finished with border, straps, and eyelets.
- Stripes are created by changing color every 2 rows.
- To change colors cleanly, complete the final yarn over of the last sc with the new color.
- Sizing is based on starting chain and total cup rows. You can also size by measuring cup height and width.
- For the second cup, you may invert the stripe order to create a mirrored look.
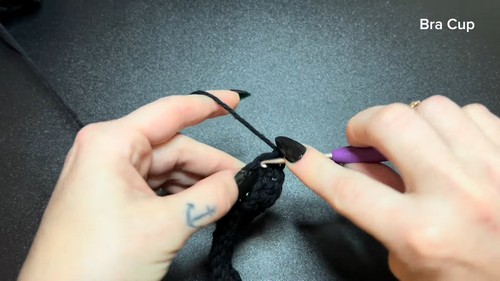
Bra Cups (Make 2)
Cup Sizing Setup
- Chain for cup base size
- Small: ch 13
- Medium: ch 15
- Large: ch 17
- XL: ch 19
Cup Row 1
- Make a slip knot and chain the number for your size
- Sc in the second chain from the hook
- Sc in each chain across to the final chain
- In the final chain work 3 sc
- Place a stitch marker into the middle stitch of those 3 sc (the second sc)
- Continue working sc down the opposite side of the starting chain
- Work sc into each chain stitch on the return side until you reach the beginning
For Cup Row 2
-
Ch 1 and turn
- Sc in each stitch until you reach the marked stitch
- In the marked stitch work 3 sc
- Move the marker into the middle stitch of the new 3 sc (the second sc)
- Continue sc in each stitch to the end of the row
Cup Rows 3 and Up
- Repeat the same shaping as Row 2
- Each row you will
- Ch 1 and turn
- Sc up to marker
- 3 sc in marked stitch
- Move marker to the new middle stitch
- Sc to the end
Stripe Plan
- Change color every 2 rows
- Example stripe rhythm
- 2 rows black
- 2 rows white
- 2 rows black
- 2 rows white
- Continue until you reach total rows for your size
Total Cup Rows
- Small: 12 rows total
- Medium: 14 rows total
- Large: 16 rows total
- XL: 18 rows total
Cup 2 Notes
- Make the second cup exactly the same size
- Option 1 mirrored stripes
- Start with the opposite color so stripe placement matches when cups face each other
- Option 2 matching stripes
- Start with the same color so both cups are identical
Torso and Underarm Extension
This section creates the side extension that continues from the cup into the corset body.
Attach and Chain Extension
- Attach yarn at the side edge of the bra cup
- Chain 11
Torso Row 1
- Sc in the second chain from the hook
- Sc in each chain across the extension
- Continue sc across the bottom edge of the bra cup
- Work evenly across the cup bottom stitches
For Torso Row 2 Shape Row
- Ch 1 and turn
- Sc2tog in the first two stitches
- Sc in each stitch to the end
Torso Rows 3 and Up
- Ch 1 and turn each row
- Sc in each stitch across
- Keep working straight after the one decrease
- Continue striping by changing colors every 2 rows
- Work for about 16 rows total or until your corset length feels right
Length Customization
- For a cropped corset look, stop around 12 to 14 torso rows
- For a longer corset look, continue beyond 16 rows
- Try on and adjust length before adding the bottom green edge
Join or Create Second Side Panel
Depending on how you want to assemble, you can create a second matching extension for the other cup.
- Repeat the torso and underarm extension steps on the other bra cup
- Ensure both sides match in length and stripe count
- Lay both pieces flat to check symmetry before edging
Main Border
This border cleans up the edges and prepares for straps and details.
Border Round
- Attach yarn to any edge
- Work sc evenly around the entire piece
- Along straight edges, place 1 sc per stitch
- Along row ends, place sc evenly so the edge lies flat
- At corners, add 2 sc in the same corner stitch if needed to prevent curling
- Continue around until all sides and top edges are bordered
Green Bottom Edge With Mesh and Scallops
This creates the signature green decorative finish.
Green Base Row
- Attach green yarn at the bottom corner
- Work 1 row of sc across the bottom edge
- Keep stitches even and not too tight
For Green Mesh Row
- Ch 4
- Dc in the third stitch from the hook
- Ch 1
- Skip 1 stitch
- Dc in the next stitch
- Repeat across the bottom edge
- This creates a mesh look with small holes
Green Scallop Row
- Begin at the start of the edge
- Skip 1 stitch
- In the next stitch work 4 hdc
- Skip 1 stitch
- Sl st in the next stitch
- Repeat the sequence across
- Skip 1 stitch
- 4 hdc in next stitch
- Skip 1 stitch
- Sl st in next stitch
- Continue until the scallops fill the edge evenly
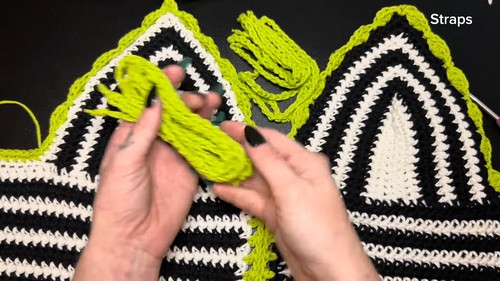
Shoulder Straps
Straps are added during the green border when you reach the top of the cup.
Strap Placement
- Work your border up to the top corner of the bra cup
- When you reach strap point, start the strap chain
For Strap Chain
- Ch 81
- Sl st back down the chain toward the cup
- Attach back into the cup edge securely
- Continue the border around as normal
Strap Adjustment
- For shorter straps, chain less than 81
- For longer straps, chain more than 81
- Best method
- Chain, try on, then adjust before slip stitching down
Corset Eyelets (Front and Back Openings)
These eyelets create holes for lacing.
Eyelet Row
- Along the front opening edge, attach yarn
- Work the eyelet pattern down the edge
- Hdc in first stitch
- Ch 1
- Skip 1 stitch
- Hdc in next stitch
- Repeat to the end
- Do the same along the back opening edge
Eyelet Notes
- Keep eyelets evenly spaced
- If your stitch count is odd, end with an hdc and skip the final chain space
Lacing Chains
Front Lacing Cord
- Make a slip knot
- Ch about 250
- Fasten off leaving a tail to weave in
Back Lacing Cord
- Make a slip knot
- Ch about 200
- Fasten off leaving a tail to weave in
Lace Up
- Weave lacing through the eyelets in a zig zag pattern
- Tie securely
- You can lace front only, back only, or both depending on fit
Fit and Support Tip
- If the front feels too low or shifts
- Start your lacing through the top green scallops on the bra cups instead of only using the eyelet row
- This pulls the cups upward and improves support
Finishing
- Weave in all ends securely
- Block lightly if needed to flatten edges
- Try on and adjust lacing tension
- Optional
- Add extra sc border rounds for more structure
- Add a lining fabric for extra comfort and coverage


Leave a Reply