
This Crochet Spiderweb Top pattern creates a bold, airy statement top built from two spiderweb cup motifs that are shaped into triangles, joined at the center, and extended into a customizable mesh torso.
Crochet Spiderweb Top
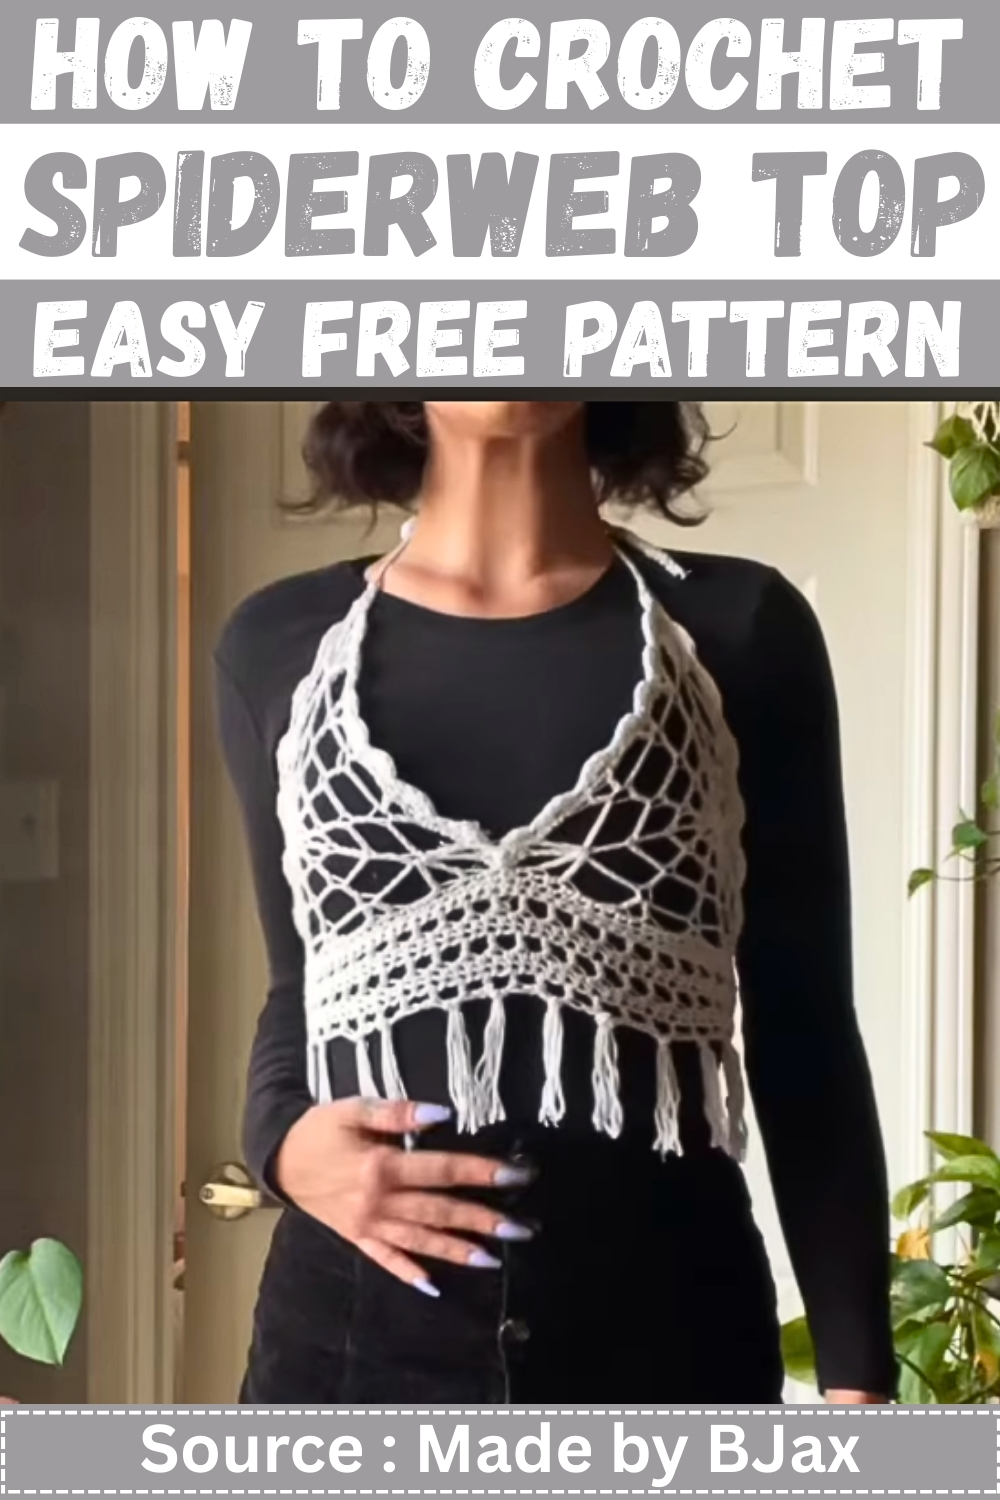
The design is lightweight but structured, with a scalloped decorative edging along the neckline and a corset style lace up back that lets you fine tune the fit. You can easily adjust the cup size by stopping earlier or adding more spiderweb rounds, and you can change the body length to make it a cropped top or a longer festival style piece. The straps are simple long chains made with doubled yarn for strength, so the finished crochet spiderweb top is secure, adjustable, and easy to style layered or on its own.
Notes
- Skill level: Confident beginner to intermediate
- Construction: Make 2 spiderweb cups, shape each into a triangle, join cups, then add torso, straps, and back lace
- Sizing approach: Adjust cup size by number of spiderweb rounds, adjust torso by starting chains and body rows
- Stitch abbreviations: ch (chain), sl st (slip stitch), sc (single crochet), hdc (half double crochet), dc (double crochet), tr (triple crochet)
- Turning: Unless stated, rounds are worked without turning
Materials
- Yarn: Any yarn you like that gives good drape (cotton or cotton blend recommended for a top)
- Hook: Match your yarn (use the hook size that gives a fabric you like)
- Scissors
- Yarn needle
- Measuring tape
- Optional: Stitch markers, cardboard for tassels
Sizing and Fit Guide
- XS: Work spiderweb circle to Round 3, then shape triangle
- S/M: Work spiderweb circle to Round 4, then shape triangle
- L and up: Add more spiderweb rounds by increasing the chain spaces each round (explained below)
- Fit check: After you shape a triangle, hold it to your bust to confirm coverage before making the second cup
Gauge
- Gauge is not critical for this design because fit is adjusted by rounds and measurements
- Focus on getting a fabric that feels supportive, not too stiff and not too loose
Phase 1 Spiderweb Circle (Make 2)
Round 1
- Ch 4
- Sl st into the first ch to form a ring
- Ch 3 (counts as first dc)
- Work 11 dc into the ring
- Sl st to the top of the starting ch 3 if you prefer a neat join
- Total: 12 dc in the ring
Round 2
- Ch 5 (counts as dc plus ch 2 space)
- Dc into the next dc
- Ch 2
- Dc into the next dc
- Repeat the sequence around
- Finish the round with a sl st to the starting chain if you are joining rounds
- Total: 12 dc with ch 2 spaces between
For Round 3
- Ch 7 (counts as dc plus ch 4 space)
- Dc into the next dc from the previous round
- Ch 4
- Dc into the next dc
- Repeat around
- Join to the start if you are joining rounds
- Total: 12 dc with ch 4 spaces between
Round 4 (S/M size)
- Ch 9 (counts as dc plus ch 6 space)
- Dc into the next dc
- Ch 6
- Dc into the next dc
- Repeat around
- Join to the start if you are joining rounds
- Total: 12 dc with ch 6 spaces between
How to Add More Rounds for Larger Sizes
- For each additional round, increase the chain space by 2
- Work the same structure each round:
- Start with ch (3 + chain space) to count as dc plus the chain space
- Dc into next dc
- Ch chain space
- Dc into next dc
- Repeat around
- Examples of chain spaces by round progression:
- Round 2 chain space 2
- Round 3 chain space 4
- Round 4 chain space 6
- Round 5 chain space 8
- Round 6 chain space 10
- Stop when the circle looks large enough to cover your cup area before shaping
Circle Fit Check
- Lay the circle flat and check that it is not ruffling or cupping
- If it is ruffling, your chain spaces may be too large for your tension
- If it is cupping too much, loosen tension or consider adding a small chain adjustment
Phase 2 Shape the Circle Into a Triangle (Make 2)

Setup Notes for Triangle Shaping
- You will create 3 corners spaced evenly around the circle
- Between corners you will work v stitches of different heights to create the triangle shape
- Half chains rule: Use half the chain space from your last spiderweb round as your spacing for triangle shaping
- Example: If your last round had ch 6 spaces, use ch 3 between v stitches in the triangle shaping section
Corner V Stitch
- Work into the dc stitch you choose as a corner point:
- Tr
- Ch 1
- Tr
- Ch 3
- Tr
- Ch 1
- Tr
- This creates a sharp corner and a top point structure
Side V Stitch Sequence Between Corners
- Between each corner, work the following into consecutive dc stitches:
- Dc v stitch: dc, ch 1, dc
- Ch half chain spacing
- Hdc v stitch: hdc, ch 1, hdc
- Ch half chain spacing
- Dc v stitch: dc, ch 1, dc
- Ch half chain spacing if needed to reach the next corner position
How to Place the 3 Corners
- Choose any dc as your first corner
- Count 4 dc stitches ahead for the second corner placement
- Count 4 dc stitches ahead for the third corner placement
- This divides the 12 spokes into 3 equal sections
- If you have trouble keeping it even, place stitch markers in the 3 corner dc stitches before you start shaping
Triangle Shaping Round Worked
- Start at a corner dc stitch
- Work the corner v stitch into that dc
- Move to the next section and work the side sequence across the next dc stitches until you reach the next marked corner
- Work the corner v stitch again
- Repeat around until all 3 corners are made
- Join and fasten off
Cup Fit Check
- Fold the triangle slightly and hold it against your bust
- Confirm that the top point and side edges look like a cup
- If you want more coverage, add another spiderweb round on both cups before shaping
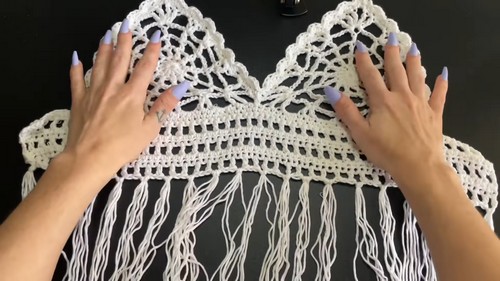
Phase 3 Connect the Two Cups and Add Edging
Prepare the Two Triangles
- Make two identical triangles
- Fasten off the first triangle
- Keep yarn attached to the second triangle
Join the Cups at the Center
- Align the triangles so their center corners meet
- Using the working yarn from the second triangle, begin joining at the center corner area
Single Crochet Border and Join
- Sc evenly around the first cup edge to create a clean border
- When you reach the center point where the cups meet, sc through both cups to join them together
- Continue sc around the second cup edge
- Aim for an even sc border that does not pull tight or flare
Scalloped Neckline Edging
- Work along the top edges of both cups
- Ch 1
- Skip 1 stitch
- Work 4 hdc into the next stitch
- Skip 1 stitch
- Sl st into the next stitch
- Repeat across the top edges
- Keep the scallops consistent by repeating the same skip pattern
Tip of Each Cup
- In the very top corner space of each cup:
- Work 5 hdc into that corner space to round and reinforce the point
Phase 4 Torso and Straps

Attach Yarn at Bottom Corner
- Join yarn to the bottom corner of the joined cups
- This is where the torso begins
Bottom Wings Chains
- Ch 10 for one back wing
- Sc along the bottom edge of both cups
- Ch 11 for the other back wing
- These chains create the side extensions that wrap toward the back
Mesh Body Rows
- Work the body in rows
- Alternate between a mesh row and a solid row
Mesh Row Structure
- Ch 3 to start the row (counts as dc)
- Dc in the next available stitch or space
- Ch 1
- Skip 1 stitch
- Repeat dc, ch 1, skip 1 across
- End the row with a dc in the last stitch
Solid Row Structure
- Ch 2 to start
- Work hdc across every stitch and into each ch 1 space from the mesh row
- Keep stitch placement consistent so edges stay straight
Repeat for Length
- Repeat the mesh row and solid row sequence
- Continue until the top reaches your desired length
- For a crop: stop around waist or underbust
- For longer: continue toward hip length
Finish the Bottom Edge
- Sc evenly along the bottom edge for a neat finish
- Optional: Add tassels or a decorative edging
Straps
Shoulder Straps
- Use two strands of yarn held together for strength
- Attach yarn at the top of one cup near the neckline edge
- Ch 80 for the strap
- Fasten off or attach to the back area depending on how you want to wear it
- Repeat for the second cup strap
Back Corset Tie
- Create a long chain of 250 to 300
- Thread it through the back wing edges like shoe laces
- Tie into a bow or knot at the bottom or top depending on your preference
Optional Tassels
Make Tassels
- Wrap yarn around cardboard multiple times to create tassel thickness
- Slide off and tie one end tightly
- Cut the opposite end to create fringe
Attach Tassels
- Insert hook through every other mesh square along the bottom row
- Pull tassel loop through
- Feed tassel ends through loop and tighten
Finishing
- Weave in all ends securely
- Try on and adjust lace up back tension
- Adjust strap length by shortening or lengthening the chain if needed
- Block lightly if your yarn benefits from it to open up the spiderweb design


Leave a Reply