
Explore the charming world of DIY fashion with the adorable Crochet Cat Ear Beanie pattern! Perfect for crafters of all skill levels, this pattern combines simplicity and style in a delightful project that caters to both beginners and experienced crocheters alike.
Crochet Cat Ear Beanie

Whether you're looking to add a touch of whimsy to your winter wardrobe or crafting a unique gift for a loved one, the Cat Ear Beanie is an irresistible choice. With customizable options that allow for a variety of colors and yarn types, you can create a personalized accessory that's as fun to make as it is to wear. Get ready to turn heads and warm hearts with your very own handmade cat ear beanie!
Materials Needed:
- Yarn (4 ply milk yarn or similar)
- Crochet hook (4 mm)
- Measuring tape or spare yarn (for measurements)
- Scissors
- Needle (for weaving in ends)
- 2 Signaling pins or bobby pins (for marking stitches)
Measurements:

Head Circumference:
- Measure your head or use a piece of yarn to get the circumference of your head.
- If using yarn, cut where it wraps around your head completely.
- Measure this length with a measuring tape for accuracy.
- Record this as the length. Example: 23 inches.
Width:
- Divide the head circumference by 2 to get the width of your project. Example: 23 inches ÷ 2 = 11.5 inches.
Pattern Instructions:

Starting Chain:
Chain Stitches:
- Make a slip knot. Chain stitches equal to the head circumference length (Example: 23 inches). Use a measuring tape to ensure accuracy or compare it to the length of the yarn used for measuring your head.
Row 1:

First Stitch:
- Skip the first chain. Into the second chain from the hook, work a half double crochet (HDC).
Continue:
- Work one HDC into each chain across until you reach the end of the row.
Measure Stitches:
- Count the number of stitches in this row and note it down (e.g., 94 stitches). This is important as every row should have the same number of stitches to maintain the shape.
Row 2 and Beyond:

Chain 1:
- This counts as the first stitch but gives height for the next row.
Flip Work:
- Turn your project so you're working back along the previous row.
HDC in Back Loops Only:
- Starting from the first stitch, work an HDC into the back loop only of each stitch across. This creates the ribbed texture of the beanie.
Marking:
- Use signaling pins to mark the first stitch of each new row to keep track of your stitches accurately.
Repeat:
- Keep repeating these steps for each row, making sure to maintain the same number of stitches (as counted in the first row) and to work in the back loops only.
Finishing the Beanie:

Height:
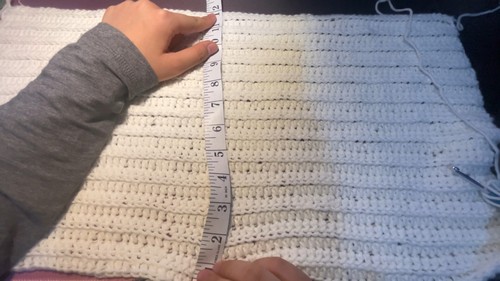
- Continue crocheting rows until the piece measures half of your head's circumference vertically
- Example: 11.5 inches or according to your initial width measurement.
Seam:
- Fold the crochet piece in half, with the wrong side facing out. Align the edges and use slip stitches to seam the sides together to form the beanie.
Weave in Ends:
- Use a needle to securely weave in all loose ends.
Optional:

Accessories:
- For a personalized touch, consider adding a bow or other decorative accessories to your beanie.


Leave a Reply