
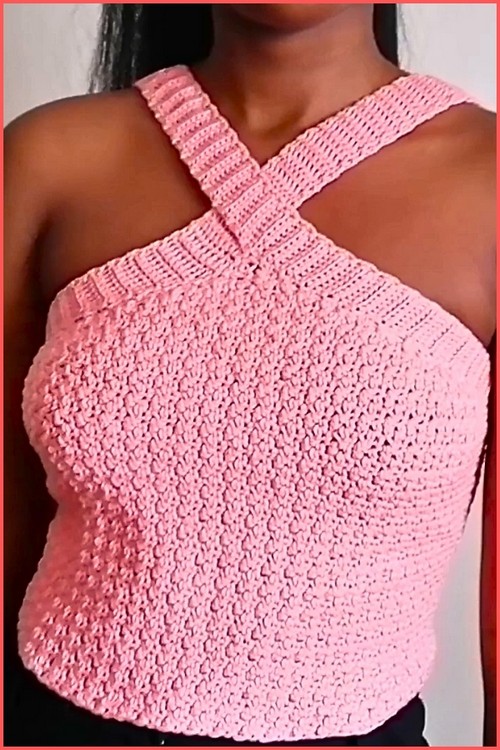
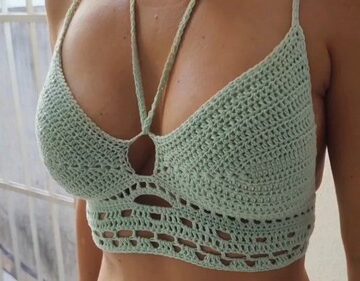
This Crochet Criss Cross Top is a fitted, adjustable handmade top that combines a clean textured front with stretchy ribbed sides and long straps that criss cross at the back. The front panel is shaped with gentle increases so it grows smoothly without sharp corners, then worked straight to reach your preferred length.
Crochet Criss Cross Top

The ribbing creates comfortable stretch and helps the top stay snug against the body, while the back lacing and tie lets you fine tune the fit even after the top is finished. You can customize the coverage by stopping the increases sooner or later, adjust the length for a cropped or longer look, and change strap length for a tighter wrap or a softer drape. It is a strong everyday summer top, but also works as a layering piece over a tank or under an open shirt.
Materials
- Medium weight organic cotton yarn approximately 375 meters for size S/M
- 4.0 mm crochet hook
- Scissors
- Tape measure
- Darning needle
- Optional stitch markers
Stitch Guide
- Chain ch
- Slip stitch sl st
- Single crochet sc
- Double crochet dc
- Back loop only BLO
- Right side RS
- Wrong side WS
Notes
- The body panel uses an alternating stitch texture
- Where you see a dc in the row below you work an sc into it
- Where you see an sc in the row below you work a dc into it
- Increases are made by working three stitches into one stitch while keeping the alternation
- Each increase stitch group is always sc dc sc placed into one stitch
- Keep your tension steady so the edges stay neat
- The panel should always begin with sc and end with dc for the cleanest edge
Sizing and Measuring
- Measure your underbust where the bottom of the top will sit
- Decide how open you want the back to be
- The front panel width should be about 3 to 4 inches less than your underbust measurement because the ribbed sides and lacing add width and stretch
- If you want more coverage or less back openness make the front panel wider before you stop increasing
- If you want a more open back or a smaller front panel stop increasing earlier
- For length measure from underbust down to where you want the hem to end
- For strap length measure from the top corner of the panel over your shoulder and across your back to the opposite lower side where it will be attached, then add extra length for the criss cross and comfort
Body Panel Front
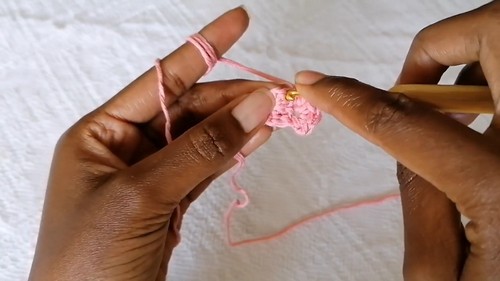
Foundation and Row 1
- Make a slip knot
- Chain 3
- Single crochet in the second chain from the hook
- Double crochet in the last chain
- Confirm you have 2 stitches total
Soft Increase
- Chain 1 and turn
- Identify the dc from the previous row
- Into that dc stitch work sc dc sc all in the same stitch
- In the next stitch which is the sc from the previous row work 1 dc
- Confirm the row ends with a dc
Soft Increase with Alternation
- Chain 1 and turn
- In the first stitch work sc dc sc all in the same stitch
- Continue the alternating texture across the row
- Work dc into the next sc you see
- Work sc into the next dc you see
- Keep repeating that alternation until the end
- End the row with a dc
On Fast Increase Both Ends
- Chain 1 and turn at the start of every row
- In the first stitch of the row work sc dc sc all in the same stitch to increase
- Continue the alternating texture across the row
- Work sc into each dc you see
- Work dc into each sc you see
- When you reach the last stitch of the row work sc dc sc all in the same stitch to increase
- Make sure you still end the row with a dc by keeping the alternation consistent
- Repeat these increase rows until the panel width reaches your target
Straight Section Without Increases
- Stop increasing once the panel measures about 3 to 4 inches less than your underbust measurement
- Chain 1 and turn at the start of the row
- Work the alternating texture across with no increases
- Keep starting with sc and ending with dc
- Repeat straight rows until the panel reaches your desired length
Fit Check for the Panel
- Hold the panel against your body under the bust
- The panel should cover the front comfortably without wrapping fully around the sides
- If it feels too narrow add more increase rows before the straight section
- If it feels too wide remove one or two increase rows or stop increasing earlier next time
- If you want it longer add more straight rows before moving to ribbing
Side Ribbing
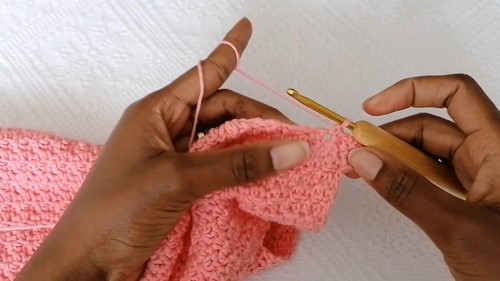
Ribbing Setup
- With RS facing you attach yarn to the side edge of the body panel at the bottom corner
- Chain 10 or chain enough to measure about 2 inches for your ribbing depth
- This chain length controls how wide the ribbed side band will be
Ribbing Row Repeat
- Starting in the second chain from the hook work sc BLO across the chain
- When you reach the body panel edge attach the ribbing to the panel by working a slip stitch or sc into the next row end of the body panel
- Turn the work
- Work sc BLO back across the ribbing stitches
- Attach again to the next row end of the body panel with a slip stitch or sc
- Repeat this ribbing row repeat until you reach the top corner of the body panel side
Repeat for the Other Side
- Attach yarn to the other bottom side of the panel
- Work the same ribbing rows up the side
- Keep your ribbing tension consistent on both sides so the top fits evenly
Shoulder Straps

Strap Construction
- After the ribbing reaches the top edge do not fasten off
- Continue working the same ribbing rows to extend upward into a long strap
- Keep using sc BLO for the ribbed texture
- Make the strap long enough to go over your shoulder and criss cross across your back to the opposite bottom side
Important Direction Tip for the Second Strap
- For the second side strap attach yarn at the top of the side ribbing
- Work downward so the RS of the ribbing faces outward on both straps
- Continue the strap length until it matches the first strap
Strap Fit Check
- Put the top against your body and bring straps over the shoulders
- Cross them at the back
- Pin or hold where you want them to attach at the lower ribbing on the opposite sides
- Adjust strap length if needed before fastening off
Assembly
Criss Cross Strap Attachment
- With the top on or laid flat cross the straps at the back
- Sew each strap end to the opposite side of the bottom ribbing using a yarn needle
- Use a sturdy seam with multiple passes so it holds tension
- Weave in ends securely
Back Edge Finish and Lacing Loops
Edge Binding
- Attach yarn to one back edge
- Work the same alternating texture along the back edges for a neat finish
- Work sc where it makes sense to keep the edge flat
- Work dc where it keeps the texture balanced
- Continue around the back opening edges
Loop Row for Lacing
- Chain 5
- Skip 2 stitches on the edge
- Single crochet into the next stitches to anchor the loop
- Repeat by chaining 5 and skipping 2 stitches evenly along the back edge
- Keep the spacing consistent so the loops line up neatly
Decorative Loop Finish Row
- Turn to the next row along the loops
- In each chain 5 loop work 5 dc into the loop
- Repeat for every loop across
- Fasten off and weave in ends
Final Tie Cord
- Attach yarn and crochet a long chain to use as a lace
- Make it long enough to weave through all the loops and tie comfortably
- Weave the chain through the loop holes like lacing a shoe
- Tie at the back to secure the top
Customization Ideas
- Make the ribbing deeper by chaining more than 10 for more side coverage
- Make a shorter strap for a tighter back criss cross
- Make a longer strap for more dramatic wrap and longer ties
- Add extra straight rows to lengthen the top
- Stop increases earlier for a narrower front and more open back
- Stop increases later for fuller coverage
Troubleshooting
- If the edges ripple reduce tension and confirm you are not adding extra stitches besides the planned sc dc sc increases
- If the panel leans to one side confirm you always start with sc and end with dc
- If ribbing flares out use slip stitches to attach more firmly or tighten BLO sc tension
- If straps twist ensure the second strap is worked in the opposite direction so RS faces outward on both sides
- If loops feel loose reduce the chain loop size from 5 to 4 for a tighter lace channel


Leave a Reply