
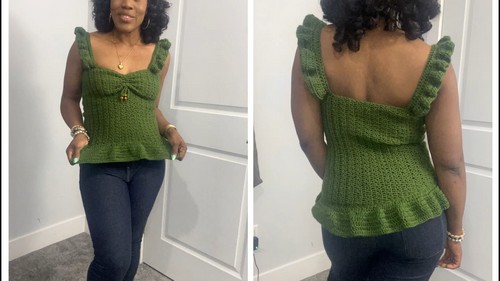
Add a flirty and feminine flair to your handmade wardrobe with this Crochet Ruffle Top Pattern. Perfect for warm-weather layering or stylish summer outings, this beginner-friendly design combines classic stitches with playful ruffle details for a trendy yet timeless look.
Crochet Ruffle Top

Whether you’re dressing it up with a skirt or keeping it casual with jeans, this lightweight and customizable top is sure to become your go-to project. With easy construction and charming texture, it’s a must-make for any crochet lover looking to elevate their style with something unique and breezy.
Materials
- Cotton or acrylic blend yarn (recommended for structure and comfort)
- 4.0 mm crochet hook (or size that matches gauge)
- Yarn needle
- Stitch markers
Optional: Beads for the scrunch detail
Foundation Chain
- Start with a slip knot.
- Chain 55.
First Row
- Skip the first two chains.
- Work a double crochet into the third chain.
- Work a half double crochet into the next chain.
- Alternate between double crochet and half double crochet across the entire chain.
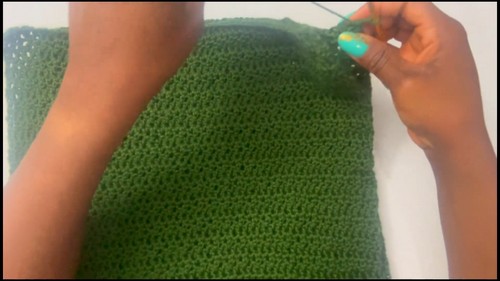
Main Body of the Top
- At the end of the row, chain two and turn your work.
- Insert a double crochet into the first stitch.
- Alternate stitches: place a double crochet on top of a half double crochet and a half double crochet on top of a double crochet from the previous row.
- Continue this alternating pattern for each row.
- Repeat until your fabric measures approximately 27.5 inches (or your desired body width).
Joining the Ends
- Fold the fabric so the short ends align.
- Slip stitch across to join the ends together.
- Chain one.
- Insert the hook through corresponding stitches from each edge, pull through, and complete the seam with slip stitches.
- Continue this until the join is complete.
Bordering the Top and Bottom
- Work single crochets evenly around the top edge of the top.
- Place one single crochet in each stitch or row edge around.
- Slip stitch to join, cut the yarn, and weave in the end.
- Repeat this process for the bottom edge.
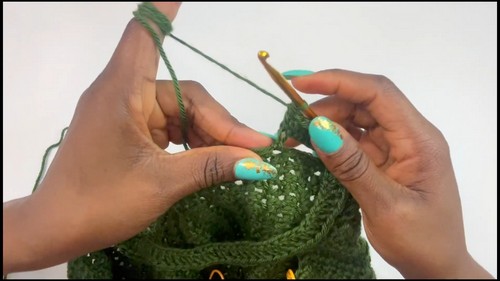
Creating the Straps
Placing Stitch Markers
- Measure 2.5 inches from the side seam and place a marker.
- Place a second marker directly across on the other side.
- Repeat on the back panel of the top.
Creating Strap Base
- At the marked point, insert your hook and pull up a loop.
- Chain 55.
Strap Row 1: Single Crochet Foundation
- Chain one.
- Work single crochets into each chain stitch back toward the top.
Strap Row 2: Double Crochet
- Slip stitch into the next stitch at the top edge.
- Chain one and turn.
- Work one double crochet into each stitch across.
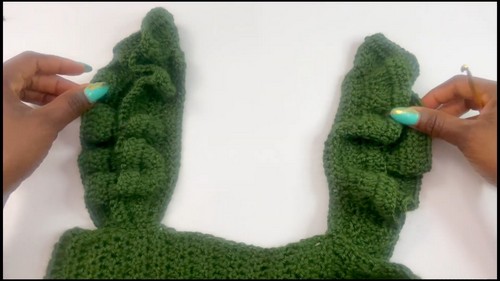
For Strap Row 3: Ruffles (2 DC per Stitch)
- Slip stitch into the next stitch at the top edge.
- Chain one and turn.
- Work two double crochets into each stitch across for a ruffled effect.
Strap Row 4: Alternating Ruffle
- Chain one and turn.
- One double crochet into the first stitch, two double crochets into the next stitch — repeat until end.
Strap Row 5: Final Row
- Slip stitch to the top, chain one and turn.
- Work one double crochet into each stitch across.
- Slip stitch, fasten off, tie both ends into a knot, and weave in.
- Repeat all strap steps for the second strap.
Bottom Ruffle Edge
Row 1: Start Ruffles
- Attach yarn at the joining seam.
- Chain two.
- Two double crochets in one stitch, one double crochet in the next stitch — repeat around.
- Slip stitch to join.
Row 2: Repeat Ruffle Pattern
- Chain two.
- One double crochet in one stitch, two double crochets in the next stitch — repeat around.
- Slip stitch to join.
For Row 3: Solid Row
- Chain two.
- Work one double crochet into every stitch around.
- Slip stitch to join.
Rows 4–6: Repeat Solid Rows
- Repeat Row 3 for three more rows.
- Total of six rows for the bottom ruffle.
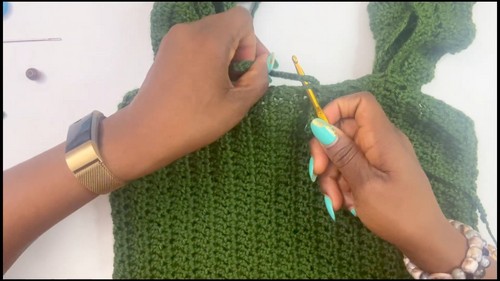
Scrunch Design (Center Detail)
- Make a slip knot with a long yarn tail (for beads if desired).
- Chain 100.
- Insert hook from the inside of the top at the center front and pull the chain through.
- Skip one or two stitches/posts and pull the chain through again.
- Repeat until scrunched effect is formed.
- Repeat on the opposite side of the center for symmetry.
Adding Beads (Optional)
- Thread beads onto the yarn tails using a needle.
- Tie knots at each end to secure the beads.
- Trim excess yarn.
Finishing
- Weave in all ends.
- Turn the top so the seam lies at the side.
- Adjust ruffles and straps as needed.


Leave a Reply