
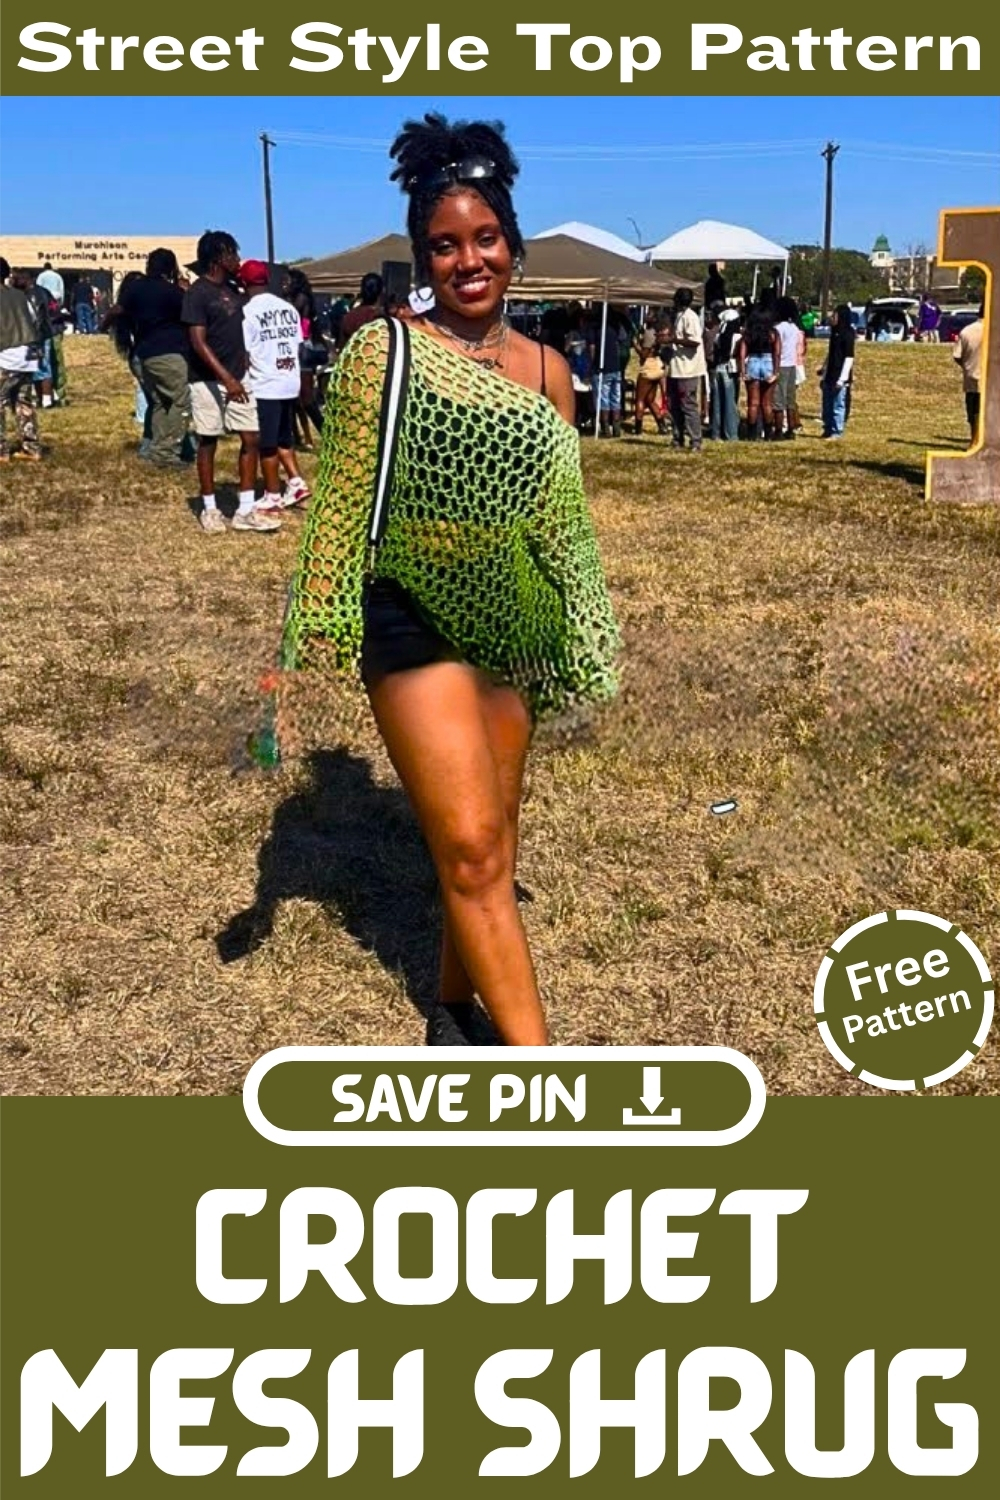
This simple crochet mesh shrug pattern creates an airy, oversized layer that instantly makes outfits look styled without adding bulk. The fabric is built with an easy mesh repeat that works up quickly on a large hook, giving you open texture and beautiful drape.
Crochet Mesh Shrug

The shaping is beginner friendly because the shrug grows in a controlled way using four marked increase points, then the armholes are formed with chain bridges before you crochet the body length and sleeves. The best part is how customizable it is: you can adjust the starting chain to fit your upper chest and shoulders, change the body length for cropped or long versions, and taper the sleeves as much or as little as you like. If you steam block acrylic yarn at the end, the shrug relaxes into a longer, softer, more dramatic fit that feels light and flowy.
Finished Look and Fit Notes
- This shrug is an oversized mesh layer with wide sleeves and an open front
- The body is worked in rounds, but you turn each round to keep the seam straight
- Four increase points create gentle expansion across the front and back
- Armholes are formed by chaining across the side sections between markers
- Acrylic yarn can be steam blocked to add length, stretch, and extra drape
Skill Level
- Beginner friendly to intermediate
- Skills used include working in the round, turning each round, simple increases, chain bridges for armholes, and sleeve decreases
Abbreviations
- ch = chain
- dc = double crochet
- sl st = slip stitch
- st = stitch
- sk = skip
- rep = repeat
Stitch Pattern Used
- Mesh stitch repeat
- Chain 4 at the start of a row counts as dc and ch 1
- Throughout the pattern you will work dc, ch 1 while skipping stitches in the foundation and working into open spaces in later rows
Materials
- 8 mm crochet hook
- Size 4 acrylic yarn
- 4 stitch markers
- Scissors
Sizing and Customization Guide
- The starting chain controls the upper body circumference around the shoulders and upper chest
- If you want a more fitted shrug, reduce the starting chain
- If you want a more oversized shrug, increase the starting chain
- Keep the starting chain a number that fits comfortably over your shoulders without pulling
- If changing the starting chain, keep the stitch marker placement symmetrical so the shrug expands evenly
Foundation Chain and Join
- Make a slip knot and chain 72
- If you are customizing, chain the number needed for your measurement
- While you are still chaining, insert your hook into the first chain to help prevent twisting
- Complete the final chain, then pull through to make a slip stitch join and form a large circle
- Make sure the chain is not twisted before joining

Mesh Round
- Chain 4 to count as dc and ch 1
- Skip 1 chain from the foundation
- Double crochet into the next chain
- Chain 1
- Repeat skip 1 chain, dc in next chain, ch 1 around
- Slip stitch into the center space of the starting chain 4 to close the round
- Chain 4 and turn your work
For Mesh Round
- Work into the chain spaces from the previous row
- Double crochet into the next chain 1 space
- Chain 1
- Continue dc in each chain 1 space, ch 1 around
- Slip stitch into the center of the starting chain 4 space
- Chain 4 and turn your work

Mesh Round
- Double crochet into the next chain 1 space
- Chain 1
- Repeat dc in next chain 1 space, ch 1 around
- Slip stitch into the center of the starting chain 4 space
- Chain 4 and turn your work
Set Up for Increases
- Lay your tube flat so it looks like a folded circle
- You will place four stitch markers to mark increase points
- Place one marker on the left side edge of the fold and one on the right side edge of the fold
- Place two more markers on the opposite side in the same positions
- These four markers create the expansion corners for front and back growth
Increase Round
- Work the mesh stitch as normal
- Double crochet into each chain 1 space
- Chain 1 after each double crochet
- When you reach a marked point, work an increase in that same space
- Increase means dc, ch 1, dc into the same chain space
- Continue mesh stitch until reaching the next marked point
- Repeat the increase at all four marked points
- Slip stitch into the center of the starting chain 4 space
- Chain 4 and turn your work

Increase Round
- Work mesh stitch around
- At each of the four marked increase points, work dc, ch 1, dc into the same space
- Keep increases stacked above the increases from the previous row
- Slip stitch into the starting chain 4 space
- Chain 4 and turn your work
For Increase Round
- Work mesh stitch around
- Increase at all four marked points
- Slip stitch to close the round
- Chain 4 and turn your work
Increase Round
- Work mesh stitch around
- Increase at all four marked points
- Slip stitch to close
- Chain 4 and turn your work
Increase Round
- Work mesh stitch around
- Increase at all four marked points
- Slip stitch to close
- Chain 4 and turn your work
Armhole Planning Notes
- The armholes are made by chaining across the side sections between the pair of markers on each side
- The chain length should match the number of mesh spaces between your markers
- In the tutorial example, the armhole chain is 19
- If you adjusted your starting chain or marker positions, use the distance between your markers as your guide
Create Armholes
- Work mesh stitch until reaching the first increase point
- Work the increase at that marked point
- Chain 19 loosely or chain the number needed to span to the next marker on that side
- Skip the entire side section between those two markers
- Double crochet into the next marked increase space to connect the armhole bridge
- Continue mesh stitch across the back section
- When you reach the next increase point, work the increase
- Chain 19 loosely again for the second armhole bridge
- Skip the second side section
- Double crochet into the next marked space to reconnect
- Continue mesh stitch until completing the round
- Slip stitch into the starting chain 4 space
- Chain 4 and turn your work
Work Over Armhole Chains
- Work mesh stitch around the body
- When you reach an armhole chain bridge, crochet across the chain space
- Work 8 double crochets separated by chain 1 spaces across that armhole chain area
- Keep the mesh rhythm consistent so the fabric stays open and even
- Continue mesh stitch around the rest of the body
- Repeat the same process over the second armhole chain bridge
- Slip stitch to close the round
- Chain 4 and turn your work
Desired Length Body Only
- Continue working the mesh stitch around with no increases
- Double crochet into each chain 1 space
- Chain 1 after each double crochet
- Slip stitch into the starting chain 4 space at the end of each row
- Chain 4 and turn your work after every row
- Repeat for about 10 to 12 rows or until you reach your preferred shrug length
- For a cropped shrug, stop earlier
- For a longer shrug, add more rows

Sleeve Setup Notes
- Sleeves are worked around each armhole opening
- You will attach yarn at the bottom of the armhole and crochet mesh rounds downward
- Decreases are done at the end of rows to taper the sleeve shape
Foundation Round
- Attach yarn to the bottom of the armhole opening
- Chain 4
- Work mesh style stitches evenly around the armhole
- In the tutorial example, work 22 double crochets with chain 1 spaces around
- If your armhole is larger or smaller, adjust the number so the sleeve opening is comfortable
- Slip stitch into the center of the starting chain 4 space
- Chain 4 and turn your work
For Rows 2 to 4 Decrease Rows
- Work mesh stitch around
- At the end of the row, decrease by skipping the last double crochet post
- Slip stitch directly into the starting chain 4 space to close the row and reduce width
- Chain 4 and turn your work
- Repeat this decrease method for three rows total
Rows 5 to 10 Work Even
- Work mesh stitch around without decreasing
- Slip stitch to close each row
- Chain 4 and turn each row
- Repeat for six rows or until the sleeve reaches the length you want before tapering again
Rows 11 to 14 Final Taper
- Work mesh stitch around
- Decrease at the end of each row using the same method
- Skip the last post, then slip stitch to close
- Chain 4 and turn each row
- Repeat for the final sleeve rows
- Fasten off and weave in ends
Repeat
- Repeat the same sleeve steps on the second armhole
- Match the number of rows and decreases to keep sleeves symmetrical
Finishing and Blocking
- Weave in all ends securely
- If using acrylic yarn, steam blocking is recommended for maximum drape
- Hang the shrug on a hanger
- Steam the fabric evenly, letting it relax and lengthen
- Allow it to cool and dry fully before wearing
Troubleshooting Notes
- If the seam is slanting, make sure you are turning after every row
- If the shrug feels too tight across the shoulders, add chains to the foundation next time or steam block for extra stretch
- If the sleeves feel too wide, add more decrease rows or decrease earlier
- If the sleeves feel too tight, reduce the number of decreases or work more rows even


Leave a Reply