
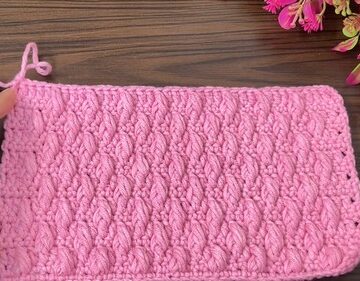
The Crochet Forest Stitch is a beautifully intricate and versatile stitch pattern that adds a delightful texture to any crochet project. It's especially admired for its dense yet delicate appearance, making it an excellent choice for items that require a touch of elegance and warmth, such as blankets, shawls, and even cozy sweaters.
Crochet Forest Stitch Tutorial

This stitch is characterized by its unique construction, which creates a reversible fabric with a pleasing, consistent look on both sides. Crafters often choose the Crochet Forest Stitch for its visual appeal and the rhythmic, soothing process of creating the pattern. The versatility in yarn and color selection further enhances its attractiveness, allowing for personalized and creative expressions in crochet projects. Whether you're a seasoned crocheter or someone looking to expand your stitching repertoire, the Crochet Forest Stitch offers a delightful challenge with
Foundation and Row 1:

- Start: Chain multiples of 3, then add 4 more chains to your base.
- First Double Crochet (DC): Skip the first three chains from the hook. In the fourth chain, perform a double crochet (DC).
- Forming V Stitches:
- Yarn over (YO), skip the next 2 chains. In the third chain, perform the following to create a V stitch:
- DC, chain 1, DC within the same chain.
- Repeat this step across the row, ensuring to skip 2 chains between each V stitch.
- In the last chain, perform a V stitch (DC, chain 1, DC).
- Yarn over (YO), skip the next 2 chains. In the third chain, perform the following to create a V stitch:
- Turn: Chain 2 and turn your work to begin the next row.
Row 2:

- Working into Skipped Chains:
- Identify the two chains you skipped at the foundation row's beginning.
- Perform a V stitch into the first of these skipped chains (DC, chain 1, DC).
- Continue the pattern above, working into each pair of skipped chains from the previous row, skipping the spaces used for the first row's V stitches.
- Last Stitch: In the last chain or space (depending on your start), complete with a DC.
- Turn: Chain 2 and turn your work.
Row 3 and Beyond:
- Locating V Stitches: From this point, each row gets easier as you'll always work into the space created by the V stitches (the chain-1 space) of the previous row, but you're effectively working one row below, creating a unique texture.
- V Stitch Pattern:
- Yarn over, insert the hook into the chain-1 space of the V Stitch from the row below the current one you're working on.
- Perform a V stitch (DC, chain 1, DC) into this space.
- Continue this pattern across, ensuring you're skipping the correct spaces and working into the V stitches of the previous row.
- Final DC: Ensure to end each row with a DC on the top of the turning chain.
- Turn: Chain 2 and continue with the pattern.
Additional Tips:
- Reversibility: This stitch creates a fabric that looks the same on both sides, making it ideal for projects where both sides are visible.
- Practice: The pattern may seem complex initially, but once the rhythm is found, it becomes more intuitive.
- Yarn and Hook: The thickness and type of yarn can affect the appearance of the stitch. Experiment with different yarns to achieve various effects.
Remember, this is a textured, reversible stitch useful for a variety of projects, particularly appealing for blankets due to its consistent look on both sides. Enjoy crafting with this distinctive crochet stitch!


Leave a Reply