
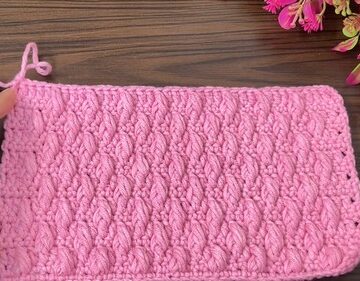
The crochet Bobble Stitch tutorial is perfect for you. With clear guidance, you'll learn to make those eye-catching, puffy bobbles that can add a dash of fun to blankets, scarves, and more. This tutorial keeps it straightforward, so you can enjoy the process of bringing a touch of whimsy to your handmade things.
Crochet Bobble Stitch

Materials Needed:
- 100% cotton yarn
- 3 mm crochet hook
Pattern Instructions:

Row 1: Starting the Foundation
- Begin with a slip knot on your hook.
- Chain stitches in multiples of 2 to your desired width (e.g., chain 16 for a small pouch).
- Add one turning chain.
- Make a single crochet in the second chain from the hook and in each chain across.
- You should have a row of single crochets.

For Row 2: Creating the Bubbles
- Chain 3 and turn your work (this counts as your first stitch).
- In the very first stitch, yarn over and insert hook, yarn over and pull through, then yarn over and pull through two loops on hook. Repeat this in the same stitch four more times until you have 6 loops on your hook.
- Yarn over and pull through all 6 loops.
- Make a single crochet in the next stitch.
- Repeat steps 2-4 across the row until you reach the last two stitches.
- Make a bubble stitch in the next stitch, then finish with a single crochet in the last stitch.

Row 3: Single Crochet Row
- Chain 1 and turn your work.
- Make one single crochet in each stitch across the row.
- This creates a smoother texture on the wrong side and sets up the base for the next bubble row.

Row 4 and Beyond: Repeat Creating Bubbles
- Continue the sequence of alternating the bubble stitch rows and single crochet rows to create a textured fabric.
- For each new bubble row, start with a chain 3, which counts as the first stitch, and proceed as per Row 2.


Leave a Reply