
Say hello to your new summer obsession the Crochet Bikini or Top with Lining Pattern that brings sass, style, and just the right touch of handmade magic. This isn’t your average beachwear, it’s a flirty, flattering, totally customizable piece that hugs just right and stays put thanks to the built-in lining.
Crochet Bikini Or Top With Lining
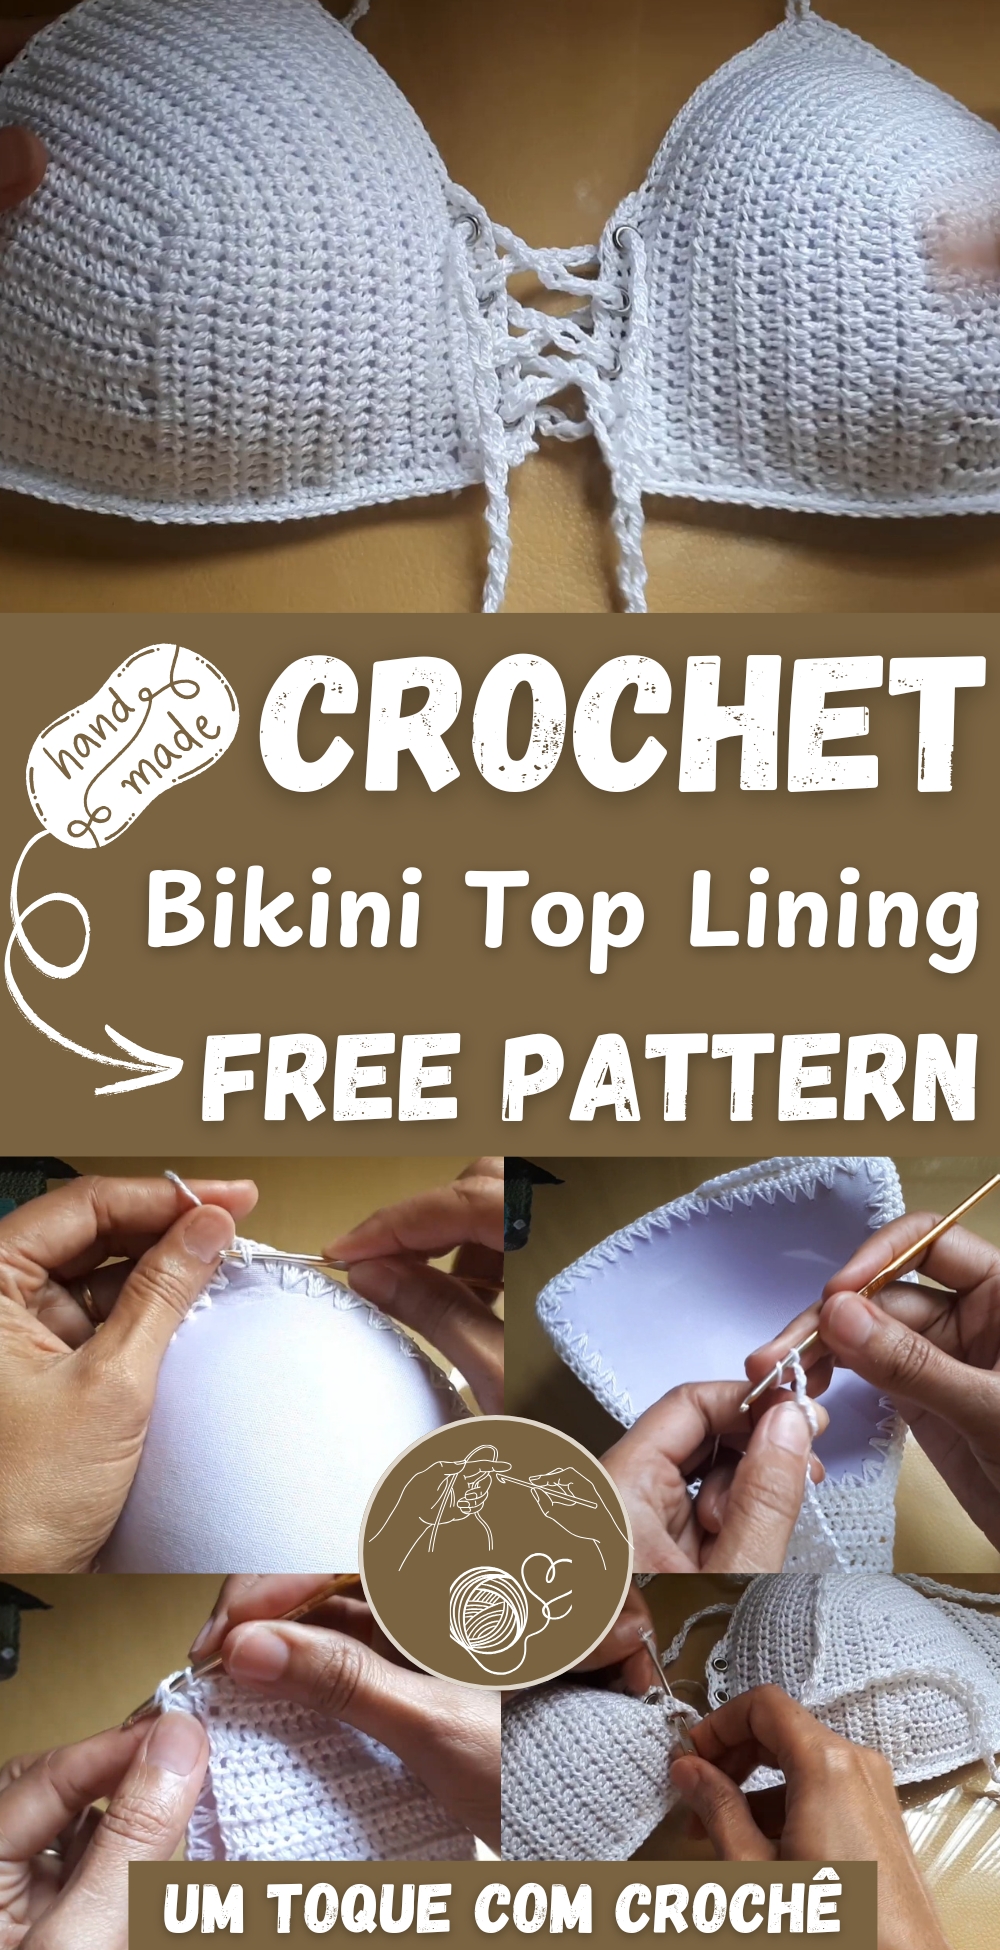
Whether you're pool-party ready or beach-bound with your besties, this pattern delivers all the sun-soaked vibes with a dash of DIY attitude. Get ready to crochet a top that’s made to move, made to slay, and definitely made to stand out.
Materials
- 2.5 mm crochet hook
- Cotton yarn (Tex 295)
- Pre-shaped bikini lining (bojo)
- Yarn needle
- Scissors
- Stitch markers or substitute (extra yarn, clips)
Preparing the Lining (Bojo)
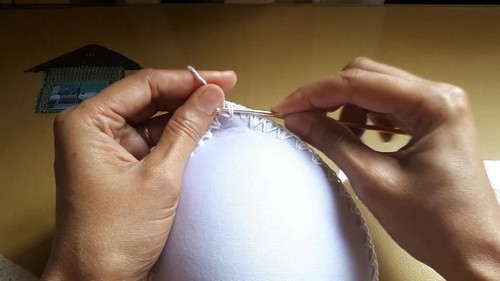
Cut and Shape the Lining
- Trim the tip of the lining into a rounded shape.
- Fold the lining, align both halves, and cut the opposite tip to match the rounded shape.
Punch Holes Around the Lining
- Use a thin hook or hole punch to make small, evenly spaced holes along the entire edge.
- Pass your hook from the inside to the outside when making holes.
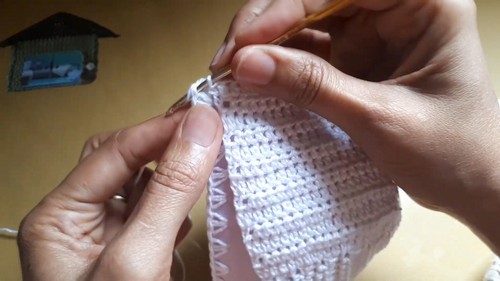
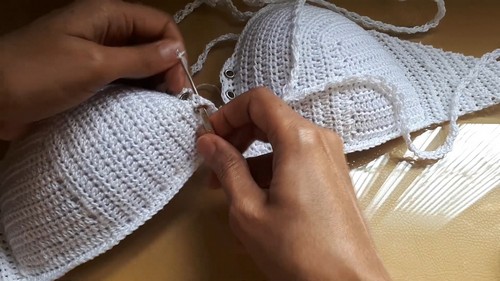
Crochet Around the Lining
- Leave a long starting tail.
- Insert a slip knot and make a single crochet (sc) into the first hole.
- Make two single crochets into each hole all around.
- At the corners, work three single crochets in the same hole.
- Secure the yarn tail by crocheting over it.
- Close the round with a slip stitch.
- Cut and weave in the yarn tail, knot and trim if needed.
- Repeat the process for the second lining piece.
Crocheting the Main Fabric for the Lining
Foundation Chain
- Leave a long tail.
- Chain 20 (adjust according to your lining size).
Row 1
- Skip the first two chains.
- Work 1 half double crochet (hdc) in the third chain from the hook.
- Make 1 hdc in each remaining chain across (19 hdc total).
Rows 2–11 (No Increases)
- Chain 2, turn.
- Skip the first stitch under the chain.
- Make 1 hdc in each stitch across, always ending in the top of the previous row’s chain-2.
- Repeat for a total of 11 rows (approx. 9 cm height).
Row 12 (First Increase Row)
- Chain 2, turn.
- Work 1 hdc in each stitch.
- In the last stitch, make 2 hdc (increase by 1 stitch).
Row 13 (Second Increase Row)
- Chain 2, turn.
- Skip the first stitch, work hdc in each until second-to-last stitch.
- Make 2 hdc in the increased stitch from the previous row.
Rows 14–24 (Continue Without Increases)
- Chain 2, turn.
- Work 1 hdc in each stitch across.
- Work until the crochet fabric fully covers the lining (approx. 13 rows past increase).
- Adjust based on tension and fabric stretch.
Attaching the Crochet Fabric to the Lining
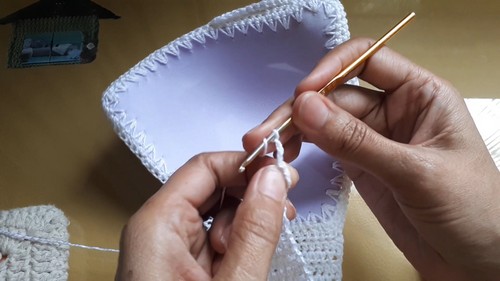
Align and Secure the Fabric
- Mark the top and corner points of the fabric with stitch markers to align with lining.
Join with Single Crochets
- Chain 1 to start.
- Insert hook through crochet fabric and corresponding lining hole.
- Make single crochets all around to attach them.
- Don’t increase along straight edges.
- At curves, work 2 single crochets in the same spot to prevent puckering.
- Carefully work through chains along the starting edge.
- Adjust tension by skipping stitches or doubling in the same space if needed.
- Join with a slip stitch to finish.
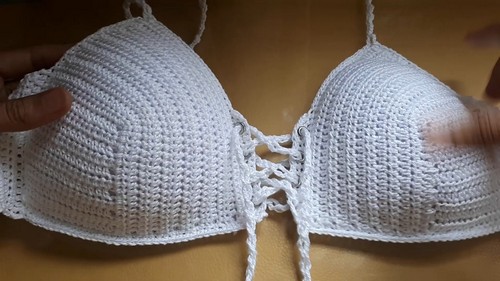
Creating the Casing for the Straps
Row 1 (Eyelet Row)
- Chain 1, turn.
- Work 2 single crochets.
- Repeat: Chain 1, skip 1 stitch, make 3 single crochets.
- Customize gaps with chain 2 or use hdc for larger openings if preferred.
Row 2 (Solid Row)
- Chain 1, turn.
- Work single crochets into all stitches and chain spaces from the previous row.
Side Strap with Tapered End
Edge Preparation
- Work single crochets evenly along the side edge until the bottom corner of the lining.
Begin Strap
- Chain 2, turn.
- Work 22 hdc (adjust as needed to match your lining width).
Tapering Rows
First Decrease Row:
- Chain 2, turn, skip first stitch, slip stitch into next.
- Chain 2 again and hdc across (no decrease at the end).
Second Decrease Row:
- Chain 2, turn, skip first stitch, hdc across until last 2 stitches.
- Do not work into the final chain-2 stitches.
Repeat these two rows alternately until only 2 hdc remain.
Make the Tie Cord
- Chain 3, turn.
- Double crochet in same stitch.
- Repeat: Chain 3, double crochet into previous space.
- Continue until desired length is reached.
- Cut and weave in the end.
- Repeat on the opposite side for a matching strap.
Creating the Neck Strap
Attach and Begin Cord
- Slip stitch yarn to the top of one cup.
- Chain 3, single crochet into next stitch, then double crochet.
- Repeat: Chain 3, double crochet into previous space.
- Continue to the desired strap length for tying.
- Repeat on the second cup.
Optional Center Tie Cord
Attach and Create Cord
- Slip stitch yarn at the bottom center of one cup.
- Chain 4, skip 3 chains, double crochet in 4th.
- Repeat: Chain 3, double crochet into previous space.
- Continue for approx. 1.2 meters or to your desired length.
- Weave the cord through the casing openings from Part 4.
Finishing Touches
- Weave in all yarn ends neatly.
- Optionally, attach rings or accessories through casing loops.
- If you don’t have a special tool, thread the cord directly through the loops.


Leave a Reply