
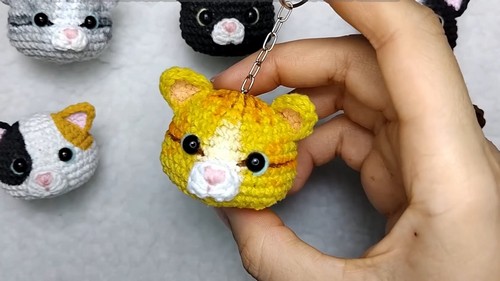
This delightful crochet cat keychain pattern is perfect for crafters who love tiny, adorable creations that make big impressions. Whether you’re making a cute charm for your bag, a handmade gift for a friend, or simply adding to your amigurumi collection, this project is both fun and rewarding.
Crochet Cat Keychain

With clear steps for crafting the head, ears, snout, and facial features, you’ll be able to personalize your kitty with fabric paint and embroidery for a truly unique touch. Lightweight, customizable, and beginner-friendly, this pattern makes a great weekend craft and a charming accessory you’ll want to make again and again.
Materials
- Verao yarn (369 Tex, 50% Cotton / 50% Polyester)
- 2 mm crochet hook
- Fabric paint and brush
- 6 mm eyes (half pearls or safety eyes)
- Silicone glue
- Acrylic yarn for eye and nose (200 Tex)
- Stitch marker, scissors, needle
- Stuffing
- Keychain ring
Crochet Abbreviations
- ST: Stitch
- R: Round
- CH: Chain
- SC: Single Crochet
- HDC: Half Double Crochet
- DC: Double Crochet
- INC: Increase
- DEC: Decrease
- BLO: Back Loop Only
- FLO: Front Loop Only
- (...): Repeat instructions in parentheses
- [...]: Total stitch count at end of round
Head
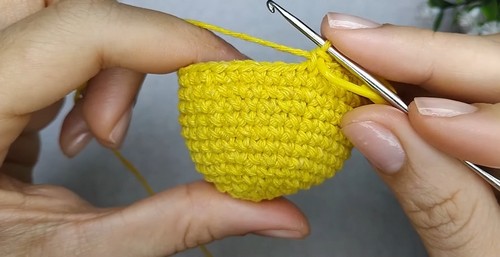
Make a magic ring
- R1: 6 SC in magic ring
- R2: 6 INC
- R3: (1 SC, 1 INC) x 6
- R4: 1 SC, 1 INC, (2 SC, 1 INC) x 5, 1 SC
- R5: (3 SC, 1 INC) x 6
- R6: 30 SC
- R7: 2 SC, 1 INC, (4 SC, 1 INC) x 5, 2 SC
- R8-R10: 36 SC
- R11: (5 SC, 1 INC) x 6
- R12: 3 SC, 1 INC, (6 SC, 1 INC) x 5, 3 SC
- R13: (6 SC, 1 DEC) x 6
- R14: (5 SC, 1 DEC) x 6
- R15: (2 SC, 1 DEC) x 9
- R16: (1 SC, 1 DEC) x 9
- Begin stuffing
- R17: (1 SC, 1 DEC) x 6
- R18: 6 DEC

Sew through front loops to close
- Hide yarn inside and cut
Ears
- Make a magic ring
- R1: 6 SC in magic ring
- R2: (1 SC, 1 INC3) x 3 (INC3 = 3 SC in one ST)
- Cut yarn tail from ring
- R3: 7 SL ST
- Pinch ends to shape triangle
- Make 2 ears
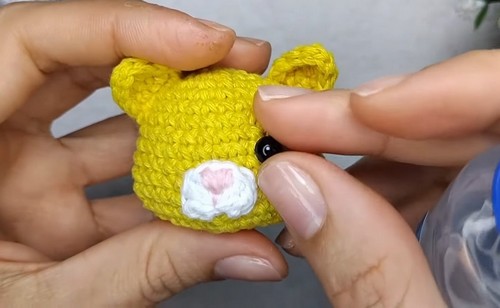
Snout
- Magic ring, CH 2, 6 DC, CH 2, SL ST into ring
- Pull yarn to close tightly and tie a knot
- Leave a long tail for sewing
- Use pink acrylic yarn to embroider the nose
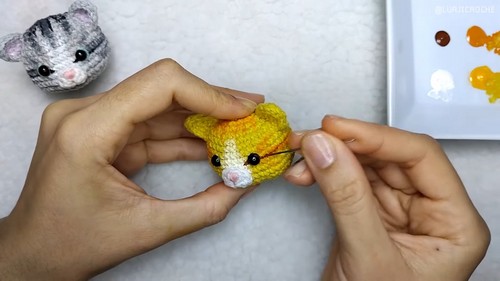
Assembly
- Identify hexagon shape at the base
- Choose one point as center of face
- Sew snout between rounds 10 and 12
- Sew ears between rounds 4 and 7
- Insert yarn in middle of ST before sewing
- Sew the unstretched side of ear (not slip-stitched part)
- Glue eyes on round 9 using silicone glue
- Use fabric paint to add facial patterns
For yellow cat: blend white, yellow, orange, and brown
- Paint slowly, expanding gradually for precision
- Add pink paint inside ears
- Embroider green details in eyes with yarn
- Attach keychain ring to complete the project


Leave a Reply