
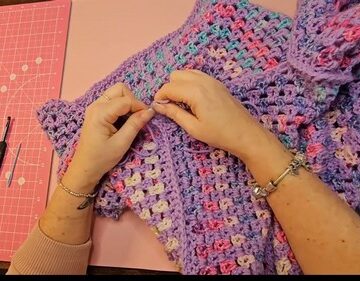
This Solid Crochet Hexagon Cardigan is a versatile and stylish piece, perfect for adding a cozy, handmade touch to your wardrobe. Designed with two identical hexagon halves that are sewn together, this cardigan provides both comfort and a unique geometric look.
Crochet Hexagon Cardigan

The pattern is beginner-friendly and includes detailed instructions for the Crochet hexagon construction, sleeve length adjustments, and assembly. Whether you're layering it over a casual outfit or wearing it for a night out, this cardigan can be customized to your preferred size and style, making it a must-have for any crocheter’s collection.
Creating the Hexagon Halves
Foundation (Starting Ring)
- Make a slip knot.
- Chain five.
- Slip stitch into the very first chain to form a ring.
Row 1 (The Six Corners)
- Chain three (counts as the first double crochet, DC).
- Make two more DC into the center ring. This forms your first cluster of three.
- Chain two (this creates the corner space).
Repeat the cluster and corner: Make three DC, chain two.

- Continue repeating until you have a total of six clusters and six chain-2 corner spaces.
- Slip stitch into the top of the initial chain three to close the round.
Row 2 and Subsequent Rows (Increasing)
- Chain three (counts as DC).
- Do not turn your work.
- DC into every stitch from the previous row until you reach a corner space.
- Corner Pattern: In the chain-2 corner space, work: [2 DC, Chain 2, 2 DC].
- This creates a new corner.
- Repeat steps 2 and 3 around the hexagon until you reach the end of the round.
- Slip stitch into the top of the initial chain three to close the round.
- Repeat this increasing row until you reach the total number of rows required for your size (see chart below).
- Remember to skip the slip stitch hole at the end of the row to avoid accidental increases.
Adding Sleeve Length and Cinching

Once both hexagons are completed, you will add length to the arm opening by working a flat row, corner-to-corner, on one side.
The goal is to reach a total of 22 rows for the sleeve's length.
- Calculate Rows: Subtract your hexagon row count from 22 (e.g., Size L: 22 - 18 = 4 rows to add).
- Attach yarn to one corner of the designated side of the hexagon.
Sleeve Length Rows (Non-Cinching):
- Chain three (counts as DC).
- Double crochet across the stitches to the opposite corner.
- At the end of the row, Chain two (or three) and turn.
- Repeat this double crochet row until you have one row remaining to meet your goal (e.g., 3 rows for Size L).
Last Row (Cinching Row):
- Chain three and turn.
- Work a DC, skipping every other stitch across the row. This cinches the sleeve.
- First Half: Chain one and cut off the yarn.
- Second Half: Keep the yarn attached to begin seaming.
Assembly (Seaming)

Shoulder/Top Seam (Slip Stitch)
- Lay both cardigan halves side-by-side, right side facing you.
- Starting from the end of the second sleeve (where your yarn is attached), slip stitch through both panels' stitches (or posts on the flat rows) all the way across the entire top edge, connecting the two halves.
Back Seam (Sewing)
- Fold the cardigan so the back pieces are aligned.
- Use a yarn needle to sew the two halves together down the center back seam, working from the neck opening to the bottom edge.
- Knot and weave in the ends.
- Turn the cardigan right side out.
Sleeve Cuff (Ribbing)
This is worked directly around the sleeve opening.
- Chain 11 (adjust this number for a shorter or longer cuff).
- Single crochet (SC) into the 10 stitches down the chain, starting with the stitch next to the hook.
- Attach to Sleeve: Slip stitch into the next three stitches on the sleeve opening.
- Turn the work.
- SC into the back loop only of the 10 stitches going back up the cuff.
- Turn: Chain one and turn the work.
- SC into the back loop only of the 10 stitches going back down.
- Repeat Steps 3-7 all the way around the sleeve opening.
- Seam Cuff: Match up the first and last rows of the cuff and slip stitch (or SC) them together.
- Finish: Chain one and cut off the yarn.

Repeat Part 4 for the second sleeve.
Final Touches
- Weave in all remaining ends.
- (Optional) You can add extra length to the body or a border around the entire front opening and bottom.

Leave a Reply