
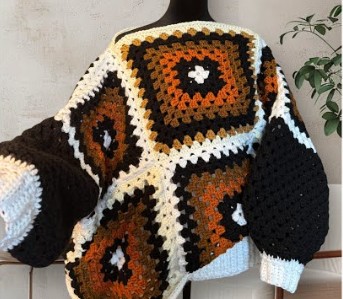
If you're looking for a beginner-friendly crochet project, this Granny Square Sweater pattern is perfect for you! Using two large granny squares, this sweater combines the timeless charm of granny squares with the warmth and comfort of a cozy, stylish piece.
Crochet Granny Square Sweater

Whether you're crafting for yourself or gifting someone special, this pattern offers a fun way to create a customizable sweater. The best part? The design can be adapted to suit any size, and the optional sleeves and ribbed edges provide the flexibility to make it your own. So grab your yarn and hook, and let's make a trendy, cozy sweater together!
Crocheting the Granny Squares (Front & Back)

Start the Center:
- Make a slip knot and Chain 4.
- Slip stitch into the first chain to form a circle.
Round 1 (The First Corner Clusters):
- Chain 3 (counts as the first double crochet).
- 2 Double Crochet (DC) into the center ring.
- Chain 2 (This is a corner space).
- Repeat the following three times: 3 DC into the center ring, then Chain 2.
- Slip stitch into the third chain of the beginning Chain-3 to close the round.
- You should have 4 groups of 3 DC separated by Chain-2 corner spaces.

Round 2 and Beyond (The Repeat):
- Slip stitch into the next two DC stitches and then into the first Chain-2 corner space.
- In the corner space, work the Corner Cluster: (Chain 3, 2 DC, Chain 2, 3 DC).
- Chain 1.
- In the next space between the 3-DC clusters from the previous round, work a Side Cluster: 3 DC.
- Chain 1.
- Repeat the Corner Cluster (3 DC, Ch 2, 3 DC) in the next Chain-2 space.
- Continue this pattern around: Corner Cluster in corners, Side Cluster (3 DC) in side spaces, separated by Chain 1.
- To close the round: Slip stitch into the third chain of the beginning Chain-3.
Finish the Squares:
- Continue repeating Round 3 until the square is large enough to cover half of your chest/back (from armpit to armpit).
- The creator made 13 rows for a size Large.
Assembly and Seaming

Align and Seam:
- Lay the two squares on top of each other, with the wrong sides facing out (or right sides together).
- Use the slip stitch method to seam the pieces together.
Shoulder Seams:
- Starting from an outer corner, slip stitch across the top edge, joining the front and back pieces.
- Stop and fasten off, leaving an open space for the Neck Opening.
- The creator left 4 side cluster spaces open for the neck.
- Repeat on the other shoulder.
Side Seams:
- Starting from the bottom corner, slip stitch up the side edge, joining the front and back pieces.
- Stop and fasten off, leaving an open space for the Armholes.
- The creator left 4 side cluster spaces open for the armhole.
- Repeat on the other side.
- Turn: Turn the garment right-side out.
Sleeves and Edging
Sleeves (Optional)
- Attach your yarn at the bottom of the armhole.
- Work the granny stitch (3 DC cluster, Chain 1) around the entire armhole opening.
- Tip for the corner: When you get to the original corner on the square (top of the shoulder), work a (3 DC, Ch 1, 3 DC) in that space to transition smoothly.
- Slip stitch to join the round.
- Continue crocheting in the round until the desired sleeve length.
- You can slightly decrease the sleeve width by occasionally working a 2 DC cluster instead of a 3 DC cluster in a space.
Bottom, Neck, and Cuff Ribbing
- Foundation Row: Attach yarn to the bottom edge and work a row of Single Crochet (SC) around the entire opening.
Ribbing Row:
- Chain 8 (or desired ribbing width).
- SC in the back loop only (BLO) starting from the second chain from the hook, across 7 stitches.
- Slip stitch into the next 2 SC stitches on the sweater body.
- Turn your work, skip the two slip stitches, and SC in BLO across the 7 stitches.
- Chain 1, turn, and SC in BLO across the 7 stitches.
- Slip stitch into the next 2 SC stitches on the sweater body.
- Repeat the ribbing process (steps 2.2-2.5) around the entire bottom edge.
- Final Edge: Join the starting and ending ribbing rows together with a slip stitch.
- Repeat the Foundation Row and Ribbing Process for the sleeve cuffs and the neck opening to finish your sweater.

Leave a Reply