
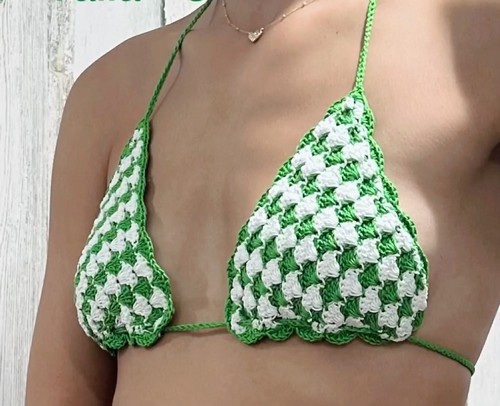
Create a show-stopping beachwear look with this detailed step-by-step crochet bikini top pattern. Designed using soft mercerized cotton and accented with elegant transparent beads, this two-tone bikini top combines beauty and functionality. The fan stitch motif gives the cups a delicate texture, while the beaded tie-back straps add a chic and secure finish.
Crochet Bikini Top

Whether you're lounging poolside or styling it under a summer cardigan, this project offers plenty of room for customization in size, color, and detailing. Perfect for intermediate crocheters looking for a wearable and trendy creation, this pattern is sure to become a favorite in your summer wardrobe lineup.
Materials
- 100% mercerized cotton yarn in two colors (e.g., green and white)
- 2 mm crochet hook
- 1 mm crochet hook (for bead threading)
- Transparent beads
- Tapestry needle
- Scissors
- Measuring tape
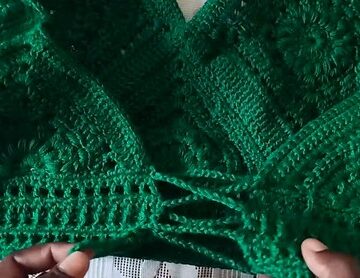
Cup Construction
- Make a slip knot
- Chain 4
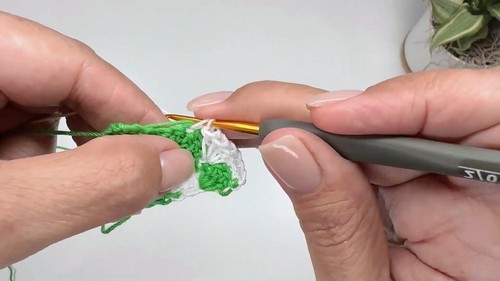
In the first chain, work 4 double crochets (DC), counting the initial 3 chains as the first DC
- Leave the 5th DC unfinished and switch to white yarn
- Chain 3 with white yarn and turn
- In the same stitch, work 4 DCs
- Make a single crochet (SC) in the third stitch of the previous fan
- In the third chain of the initial 3 chains, make 5 DCs, leaving the last DC unfinished
- Switch to green yarn, chain 3, and turn
- In the same stitch, make 2 DCs (3 total with chain)
- SC in the third stitch of previous fan
- Create a fan of 5 DCs in the center SC from the row below
- SC in the third stitch of the next fan
- In the third chain of the previous row, work 3 DCs, leaving the last DC unfinished
- Alternate between rows starting with a full fan (5 DCs) and a half-fan (3 DCs)
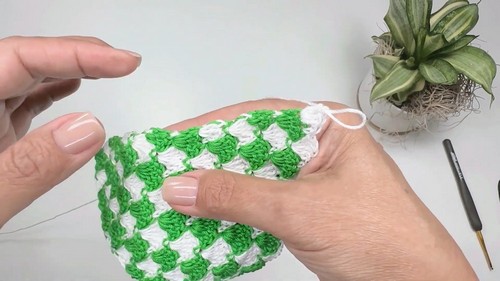
Always carry the contrasting yarn inside stitches
- Repeat until you reach the desired size (approx. 18 rows per cup)
Side Detail for Cord
- With green yarn, chain 1
- Work 2 SCs in the high stitch of the first fan on the side
- Continue working 2 SCs in each fan’s high stitch
- Chain 1 between each pair of fans
- At the corner, work 4 SCs
- Switch to white yarn
- Repeat same stitch pattern along the opposite side
- Leave final SC unfinished to change to green yarn
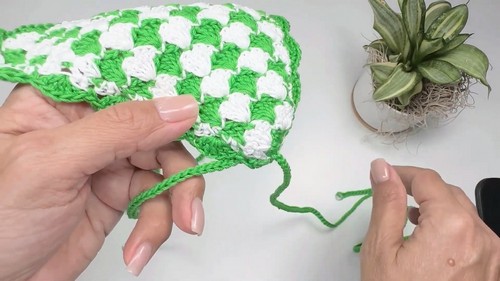
Final Border and Straps
- With green yarn, chain 1 and turn
- In the first space, work 2 SCs
- Skip 4 SCs, then make a fan of 5 DCs over the chain space
- Skip 2 SCs, SC in the center of next 4 SCs
- Repeat the fan–SC pattern (6 fans per side)
- SC in the second SC of the corner 3-SC group
- Repeat same pattern along second side of the cup
- At the bottom of the cup, work 7 fans total over chain spaces
- SC in the space where 2 SCs were previously made
Chain 130 for the strap
- Use 1 mm hook to slide a bead through the final chain
- Switch to 2 mm hook
- Slip stitch in every chain back to the start
- SC into the original space
- Slip stitch over the first SC, cut yarn, and fasten off
- Repeat for second cup, starting final border on the opposite side
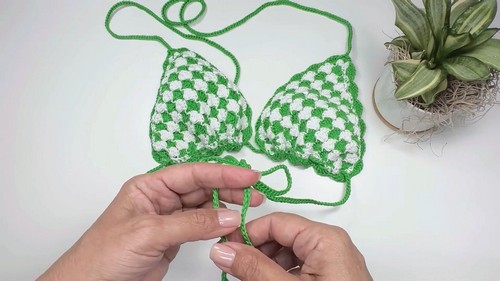
Connecting the Cups and Back Cord
- Create a slip knot
- Slide a bead onto the loop using the 1 mm hook
- Switch to 2 mm hook and chain 300
- Slide another bead onto the final loop
- Slip stitch back down the chain to complete the cord
- Slip stitch at the starting stitch, fasten off
- Use tapestry needle to weave in all yarn ends
- Align cups with 7-fan sides facing center chest
- Thread the cord through the chain spaces on each cup’s side
- Skip 4 SCs between threading points
- At the corner, thread cord between the 2nd and 3rd DC of the half-fan
- Repeat for the second cup


Leave a Reply