
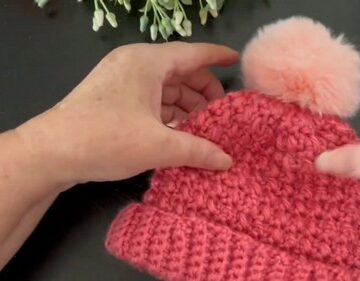
This adorable baby crochet hat pattern is designed especially for little ones aged 3 to 6 months. Using soft double-knit yarn in two complementary colors, the project creates a cozy and stretchy hat with a ribbed band and shell-patterned body.
Crochet Baby Hat

The easy-to-follow steps make it perfect for beginners who want to practice switching colors and shaping a fitted baby hat. You can also customize it with different color combinations or add a pom-pom for a playful finish, making it a thoughtful handmade gift or market-ready item.
Materials
- 3.5 mm crochet hook
- Two colors of 8-ply or double-knit yarn (Gray and Blue)
- Yarn needle and scissors
- Optional pom-pom for finishing
Crocheting the Band (Gray)
- Make a slip knot and chain 12.
- SC in the second chain from the hook and across to get 11 stitches.
- Chain 1, turn, and SC in the back loop only for ribbing.
- Repeat until the band measures 14 inches long.

Joining the Band
- Fold the band so both ends meet.
- SC through each matching stitch on both ends to join into a loop.

Main Hat Body (Gray and Blue)
- Round 1 (Gray): SC evenly around the band’s edge, about 2 SC between each rib. Join with SL ST.
- Round 2 (Gray): Chain 3 (counts as DC), make 2 more DC in the same stitch.
- Skip 2 stitches, 3 DC in the next stitch.
- Repeat around and join. Fasten off gray.
- Round 3 (Blue): Join blue yarn between DC groups, chain 2, and work 2 more DC in the same gap.
- Continue 3 DC in every gap around, then join and fasten off.
Alternating Rounds: Reattach gray, repeat the 3 DC in every gap.

- Continue alternating colors until the hat measures 6.5 inches long.
Decreasing for the Crown (Gray)
- Keep gray yarn attached after the last color round.
- Round 1: Chain 1, SC 2, SC2tog around. Join.
- Round 2: Chain 1, SC 1, SC2tog around. Join.
- Round 3: Chain 1, SC2tog around. Join.
- Fasten off leaving a long tail.

Finishing
- Thread the tail through a yarn needle.
- Weave in and out through the top stitches and pull tight to close the hat.
- Secure and weave in all ends neatly.
- Optionally sew a button inside the crown and loop a pom-pom tag through for a cute finish.
Leave a Reply