
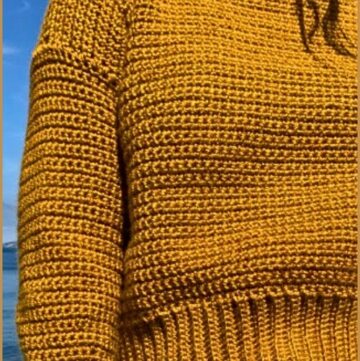
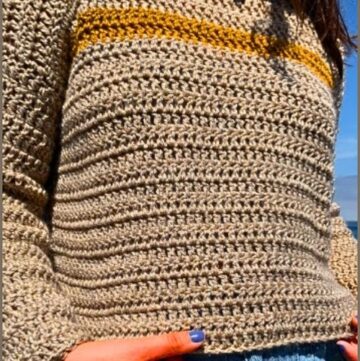
This granny square trim crochet sweater pattern combines classic crochet elements with a clean, modern construction. The design starts from a decorative granny square hem and builds upward into a relaxed, wearable sweater body using an easy alternating stitch pattern.
Crochet Granny Square Sweater

With two hook sizes and simple shaping, this pattern offers flexibility in fit, length, and sleeve style, making it easy to customize for different seasons or personal preferences. The finished sweater is comfortable, visually interesting, and perfect for showcasing color combinations while keeping the overall construction beginner friendly and adaptable.
Materials
- Yarn in multiple colors for granny squares and one main color for the body
- 2.75mm crochet hook
- 5mm crochet hook
- Scissors
- Yarn needle
The Granny Square Trim
- Create a magic loop using the 2.75mm hook
- Chain 3 and work 2 double crochets into the loop
- Chain 2 and work 3 double crochets, repeat this sequence three times
- Chain 2 and slip stitch to the top of the starting chain while changing to a new color
- Chain 3 and turn, work 2 double crochets, chain 2, and 3 double crochets in the corner space
- Chain 1 and repeat corner clusters around the square

- Change color again, chain 3 and turn
- Work 2 double crochets in side spaces and work 3 double crochets, chain 2, and 3 double crochets in each corner
- Chain 1 between all clusters
- Slip stitch across to a corner
- Place two squares right sides together and single crochet through both layers to join
- Continue joining squares until the strip fits comfortably around the waist
- Join the first and last squares to form a continuous loop

The Main Body
- Switch to the 5mm hook and main body color
- Attach yarn at a seam of the granny square loop
- Work single crochets evenly around the top edge with 12 single crochets per granny square
- In the first stitch work 1 single crochet and 1 double crochet
- Skip the next stitch
- Repeat the sequence of working 1 single crochet and 1 double crochet in one stitch and skipping the next stitch around
- Slip stitch to the first single crochet at the end of the round
- Chain 1 and turn the work
- Repeat rounds until the body reaches the armhole height

Front and Back Panels
- Divide the total stitch count evenly for front and back panels
- Work each panel separately in rows using the same stitch pattern
- At the end of each row skip the second to last stitch
- Work 1 single crochet and 1 double crochet in the final two stitches to keep edges clean
- Continue until both panels reach the desired height
- Turn the sweater inside out
- Align shoulder edges and single crochet them together
- Leave a centered opening for the neckline
Sleeves and Assembly
- Create a smaller loop of granny squares for each sleeve cuff
- Join the squares into a circle that fits comfortably around the arm
- Attach the main body yarn to the sleeve cuff
- Work the same single crochet and double crochet stitch pattern in rounds
- Continue until the sleeve reaches the desired length
- With the sweater inside out, align the sleeve at the armhole
- Single crochet the sleeve directly onto the body
- Repeat for the second sleeve

Finishing
- Weave in all loose ends
- Turn the sweater right side out and adjust fit if needed


Leave a Reply