
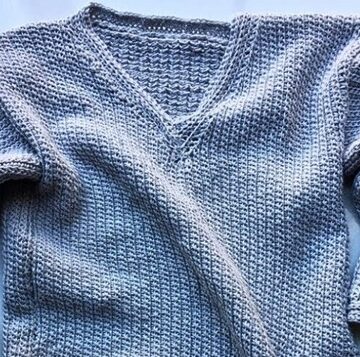
This crochet sweater pattern is a perfect project for beginners and experienced crocheters alike. Combining Half Double Crochets (HDC) and Single Crochets (SC), it creates a cozy, ribbed finish that's stylish and functional. The pattern is worked in four separate panels—two for the front, one for the back, and two sleeves allowing for easy customization in terms of length and fit.
Ribbed Crochet Sweater

Ideal for chilly weather, this sweater can be made in various yarns and colors to suit your wardrobe. Whether you want a snug fit or a looser style, the simple shaping and ribbing ensure this piece will be both comfortable and fashionable.
Materials
- Yarn: DK acrylic yarn
- Hook: 4.5 mm hook
- Stitches: Half Double Crochet (HDC) and Single Crochet (SC)
Back Panel (x1)
- Foundation Chain: Make a slip knot, chain 70, plus one for turning (Chain 71 total).
- Row 1: Work 63 HDC. For the remaining seven stitches, work 7 SC for the ribbing.

Subsequent Rows:
- Chain 1 each time you turn your work.
- Ribbing: Always work the 7 SC stitches in the back loop only.
- Pattern: If the row starts with the SC ribbing, work the 7 SC first, then HDC to the end.
- If the row starts with HDC, work the HDC first, and finish with the 7 SC ribbing.
- Length: Repeat the pattern for 39 rows.
- Finish: Chain one and leave a long tail for sewing.
Front Panel (x1)
- Start: Chain 70, plus one for turning.
- Length to Neckline: Work the same pattern for a total of 11 rows.

Shape Neckline (Starting Row 12):
- On the 12th row, skip the last five stitches of the row.
- Chain 1, turn, and continue working the pattern.
- You will now have 58 HDC and 7 SC (65 total stitches).
- Continue this reduced pattern until you have 28 rows in total.
Return to Original Width:
- At the end of the 28th row, add five chains plus one for turning (6 chains total).
- Continue working until you reach 39 rows.
Sleeves (x2)
- Foundation Chain: Chain 58, plus one for turning.
- Pattern: Work the same pattern of HDC and SC, but use 6 SC for the cuff ribbing instead of 7.
- Length: Continue working until you reach 27 rows.
- Join: Chain 1, fold the sleeve in half, and use slip stitches to join the sides together to form the tube.
- Finish and cut the yarn.

Assembly
- Shoulders: Attach the front and back panels at the shoulders by sewing them together with a yarn needle.
- Side Seams & Sleeves: Attach the sleeves to the armholes.
- Sew the side seams of the sweater body and the underarm seams of the sleeves in one continuous seam.
Neckline Edging (Ribbing)
- Base: Join the yarn at the neckline and make a round of Single Crochets around the neckline.
- Finish with a slip stitch into the first SC.
Ribbing:
- Chain five.
- Work SC starting from the second chain from the hook, then use a slip stitch/decrease to join the ribbing to the edge of the neckline SC round.
- Turn your work, skip the first stitch, and work four SC.
- Chain one, turn, and repeat the pattern, working the SC in the back loop only and joining to the neckline edge.
- Finish: Once the ribbing goes all the way around, use slip stitches to join the ends of the ribbing together.

Measurements
- Length (Top to Bottom): 48 cm
- Width (Across): 40 cm
- Sleeve Length: 50 cm


Leave a Reply